Mastering dry fly fishing for trout on a river is often seen as the peak of fly fishing. Here, Dr Paul Gaskell shows you how...
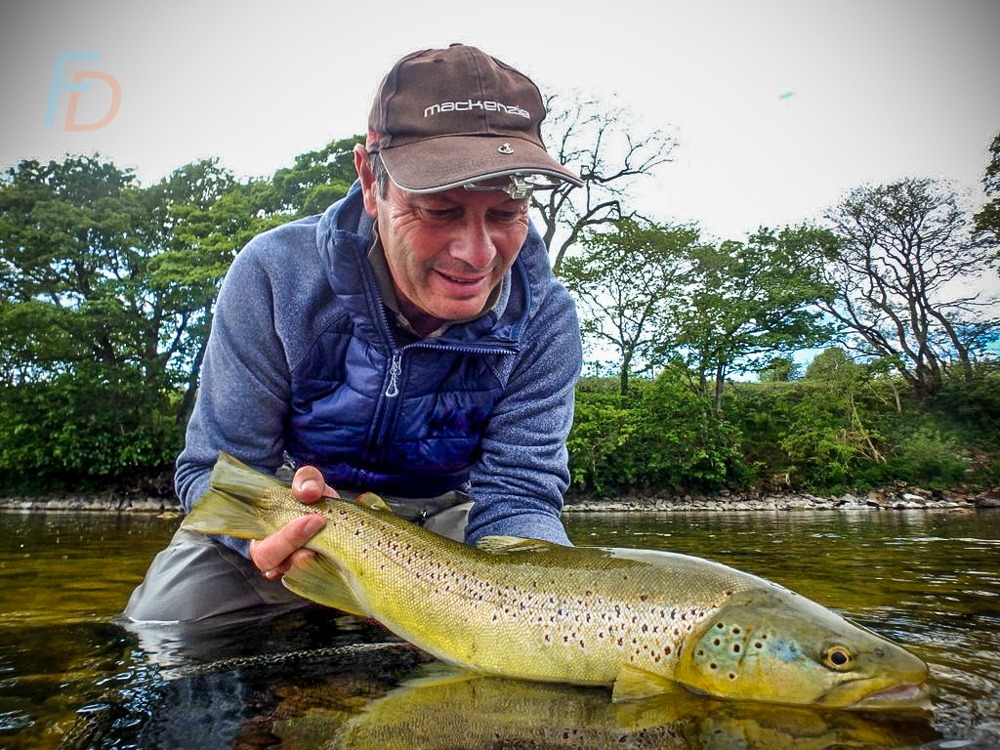
Paul Procter (a different "Paul" to the author!): Legendary expert in dry fly fishing for trout (Twitter: @paulprocter)
With famous figures such as Frederick Halford and Theodore Gordon – there’s a grand tradition for the dry fly art on either side of the Atlantic. The weight of that tradition can be enough to leave anglers a bit over-awed. While there are some unbelievably skilful anglers like Paul Procter (above) stalking big, wild fish using incredible powers of observation, take heart – getting started with dry fly need not be as difficult as that.
Busting some myths on dry fly fishing for trout
In fact, once you have nailed down your fly casting skills, dry fly can be one of the more straight-forward methods of fly fishing. How can I possibly say that with a straight face?
Well:
In other words, so many of the things that you need to develop a sixth sense for in sub-surface fishing in three dimensions are laid out right in front of you for a lot of dry fly fishing situations. As an aside, you can compare dry fly at wet by clicking my guide to wet fly fishing.
The Aim of the Game
The basic idea is to cast your fly upstream of the fish – just far enough that it can see and then easily intercept the fly as it drifts down over their head. As you see the fish take the fly into its mouth AND then turn back down to its holding depth, you set the hook by lifting the rod tip.
For getting started in dry fly fishing, keeping that simple idea in mind is more than good enough to get you into fish (whether you land them or not depends on what happens after that).
Sounds pretty simple right? Well, of course, there CAN be a bit more to it than that, but we'll break the "what happens if Plan A doesn't work" down into bite-size chunks from here on in...
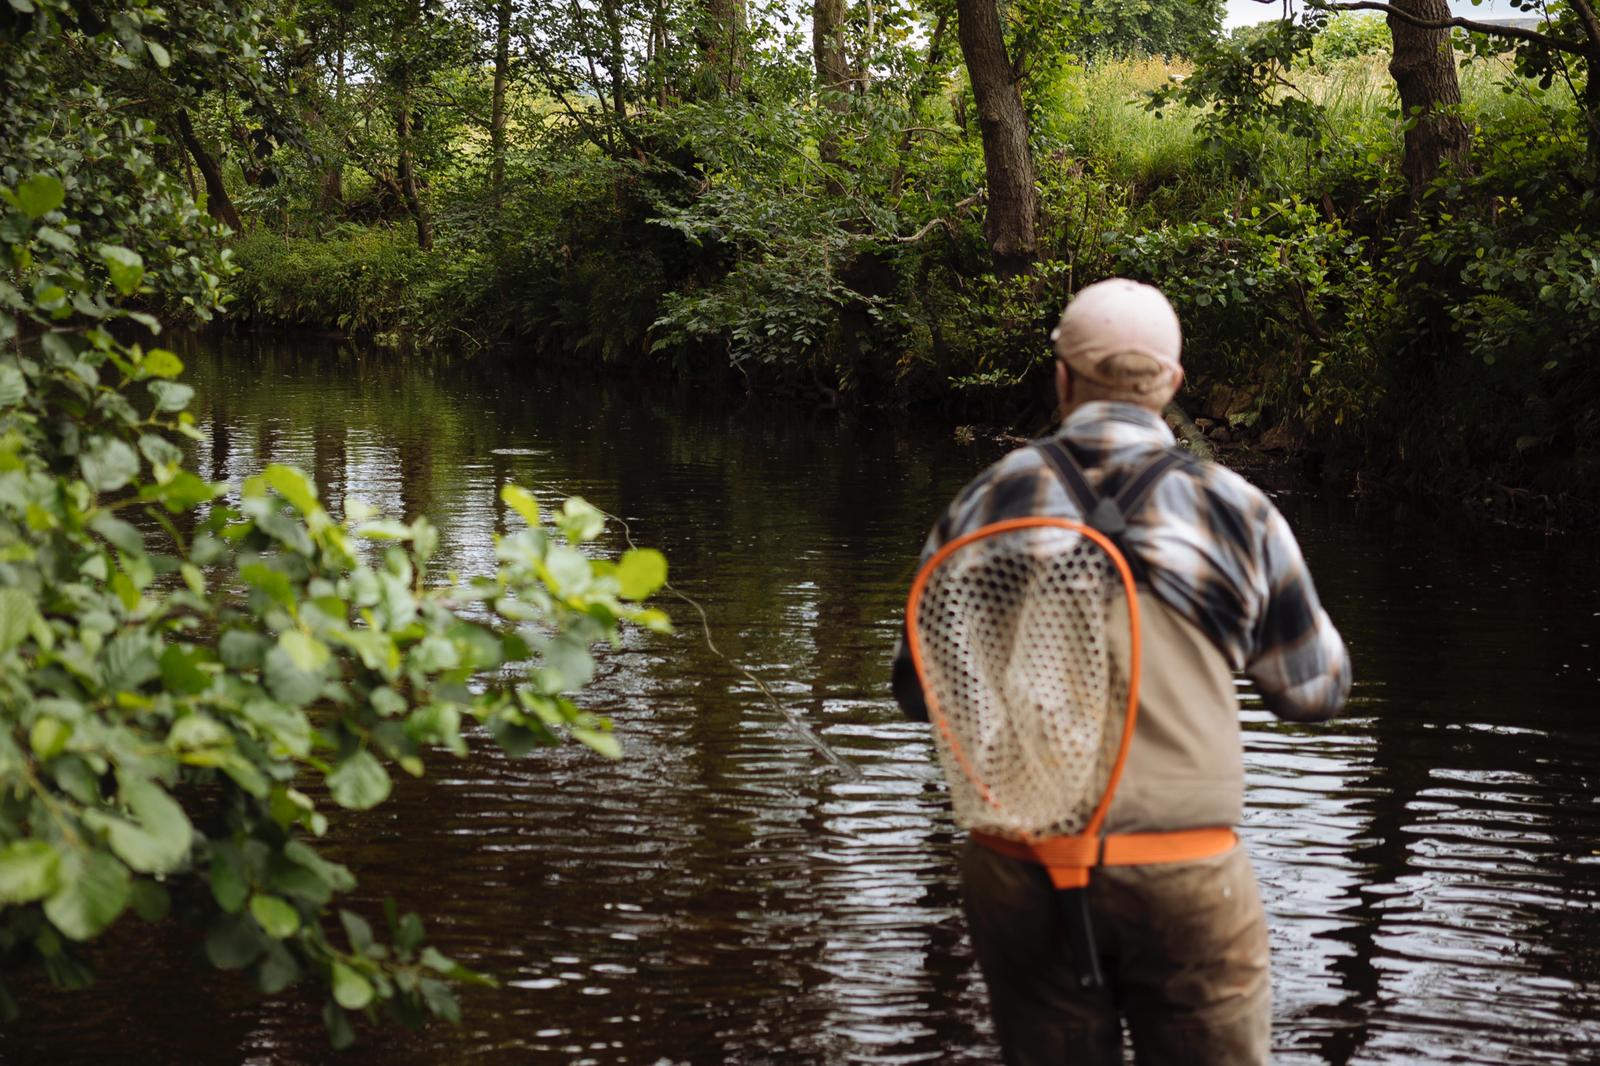
Stage 1 Success: Dry fly drifted over a feeding fish which rises and eats it (Photo by Duncan Philpott)
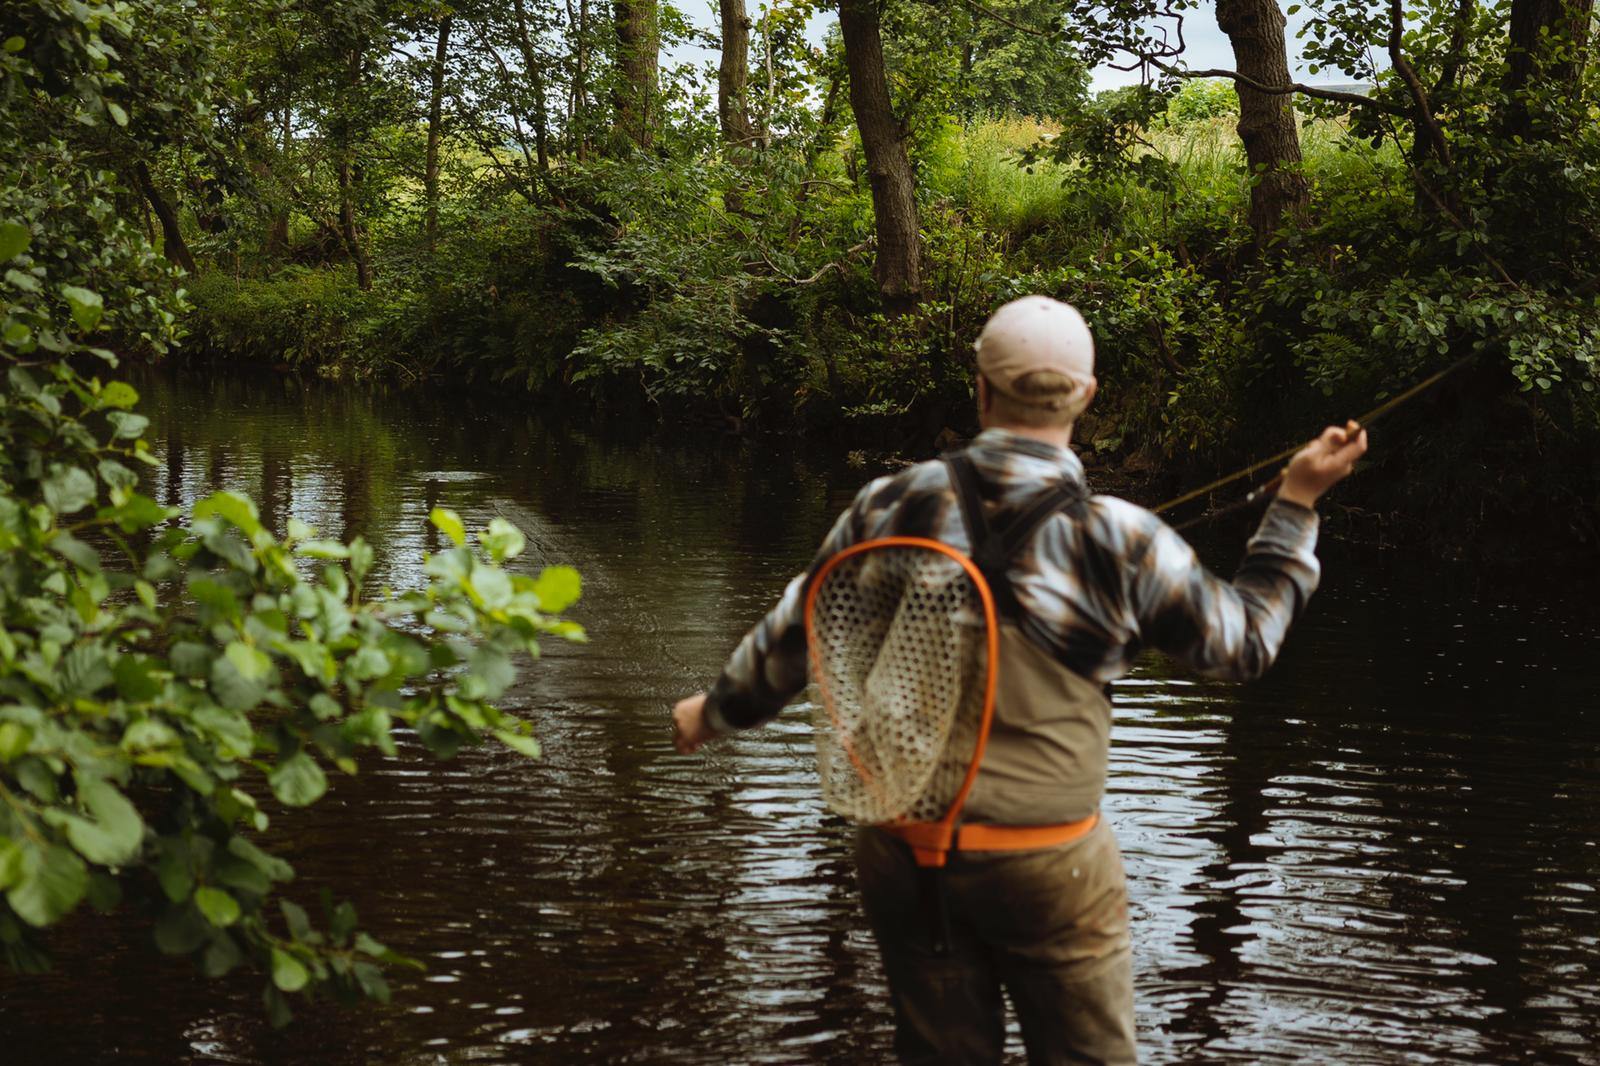
Stage 2: Oscar Boatfield sets the hook - and we're in (Photo by Duncan Philpott)
As well as one nymph capture - Mayfly Project Ambassador Susan Skrupa (below) shows a typical day of dry fly fishing for trout while trying out her Orvis Clearwater 3-weight on the Cressbrook and Litton fisheries of the Derbyshire River Wye (note, Fishing Discoveries has no financial affiliate commissions with Orvis - it's "just the facts Ma'am").
This is possibly the last of only two or three rivers in England to support self-sustaining/stream-bred populations of rainbow trout as well as brown trout. It's also a natural opportunity to express Fishing Discoveries' support of the 50/50 on the water initiative:
"Active" Drifts: Under-represented in Dry Fly Fishing for Trout
Many anglers are unaware that you have two choices for HOW your fly should drift:
- Carried only by the current in a “dead drift” (this is the safest first option to take – and with trout your first drift over them is your best chance; so make it count).
- NATURAL Movement (the presence of organised movement is one of the surest signs of "life" to a visual predator)
The vast majority of guidance on dry fly fishing concentrates on dead drift at all costs. Make no mistake, you need to be great at dead drift – it is an essential skill. It is, as I'll repeat later, usually essential to dead-drift spent spinner imitations for example.
That being said - by adding controlled and subtle movement to that foundation you’ll really strengthen your dry fly game. Although based on both sub-surface and dry fly patterns, the YouTube Mini Series "Fly Action in Focus" shows what a game-changer fly manipulation tactics can be.
So, whether you’re using dead drift or an actively manipulated fly, there’s a few things to get right before this plan will work. Let's have a look at a no-nonsense rundown to setting yourself up for success with the dry fly...
Free Fast Track to River Fly Fishing Success
Just before we dive into dry fly specifics, one way to give yourself an unfair advantage with a well-rounded on-stream approach is by using my Free e-book and 5x best kept secrets email course:
Basic River Trout Dry Fly Gear Rundown
Tips for a healthy(!) and effective dry fly collection
It is very easy to get carried away and have far too many dry flies. Few people are immune to this – and they are really satisfying to tie. In fact, feel free to indulge in a bit of excess if you enjoy it...
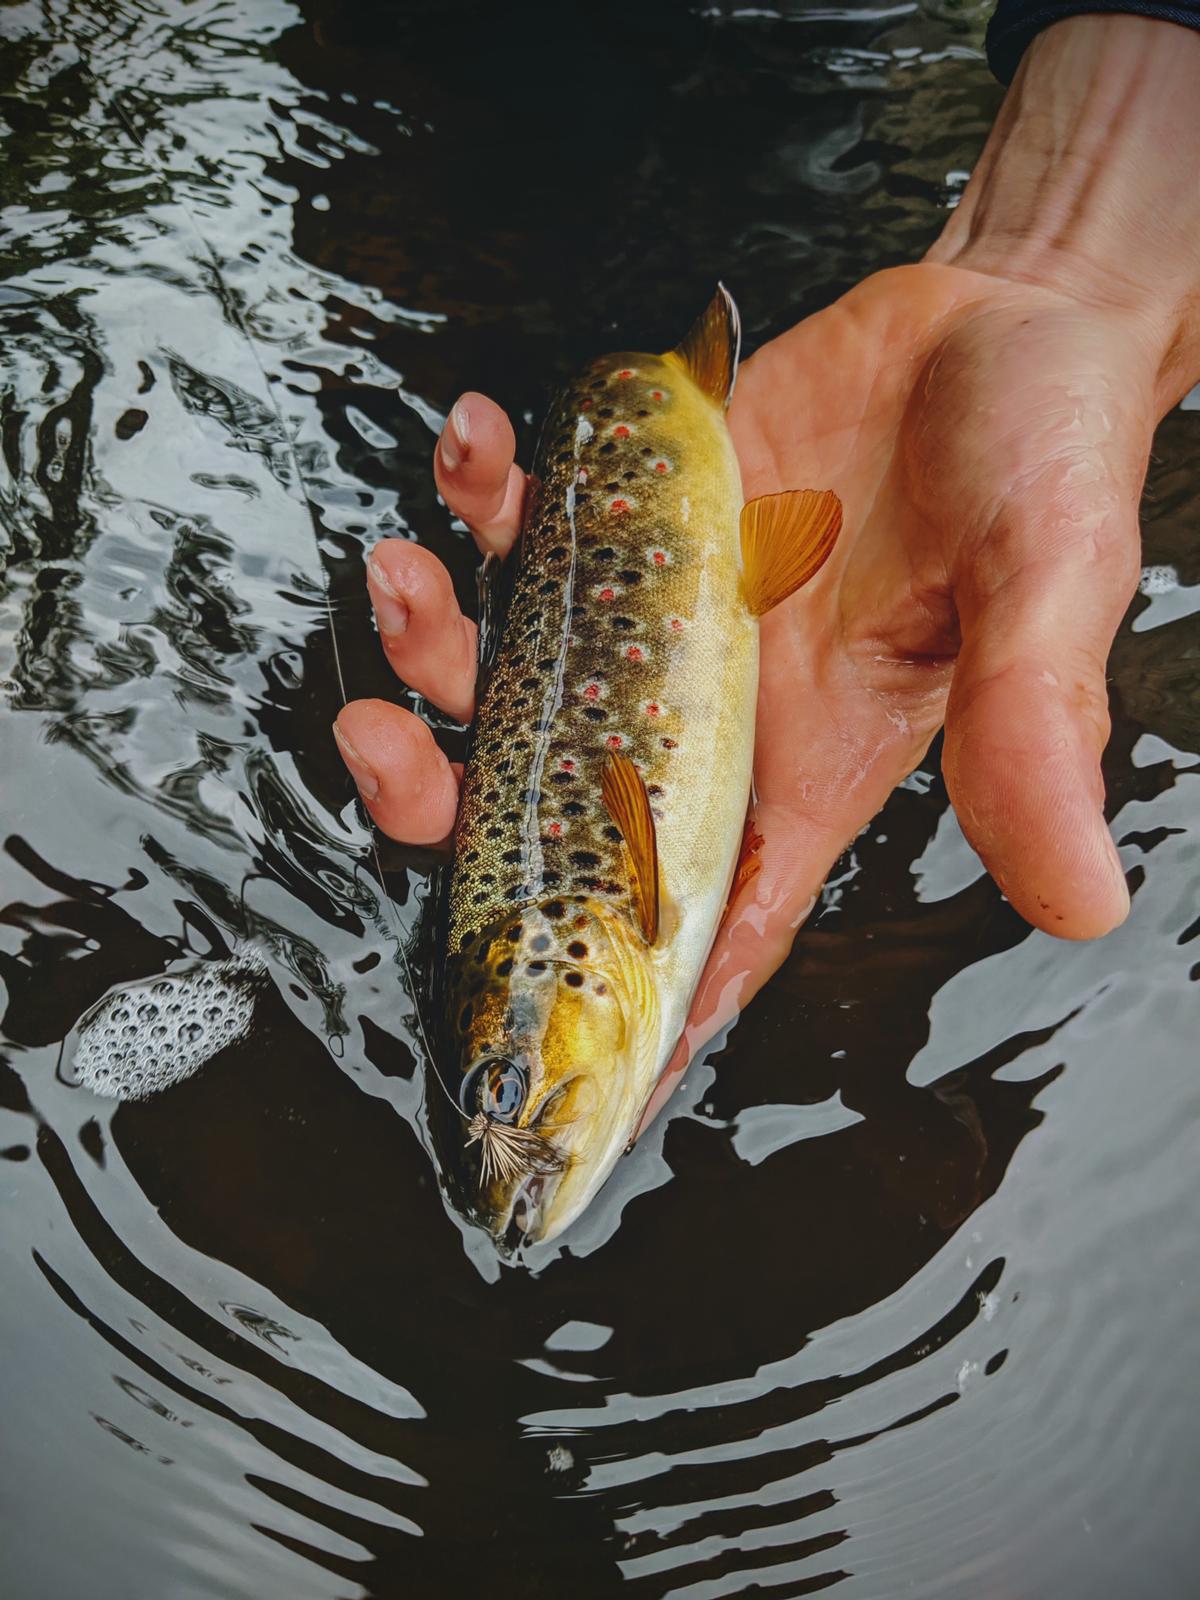
Perfect result on a dry fly (Photo: Duncan Philpott)
Just try not to lose the fun by getting a bit too fanatical in either direction (whether that’s “minimalist” or “hoarder”). Of course, if you’re enjoying going down a particular rabbit hole, go for it.
Dry fly fishing for trout: Insect Biology & Fly Design
Having a basic idea of what river flies hatch on your stream can be helpful. In fact, knowing more about the habits of the flies that trout feed on can really up your game. However, don't be put off if your entomology skills are a bit lacking - there is huge value in basic observation while you are out on stream. In fact, this skill is critical to success in dry fly fishing for trout:
Just being able to look at the rough size, profile and approximate colour of the flies in and on the surface of the stream while you are fishing is more than good enough to get you up and off to the races.
In a lot of cases it is actually much better than relying on what “should” be hatching according to the text books.
Example River-fly Lifecycles
To help you make sense of the stuff you'll see on stream, here's a whistlestop tour of important points. So, first things first...
All river flies (flying insects that have aquatic larval stages) start life as an egg, then their aquatic larvae (called nymphs) grow and moult their skins several times.
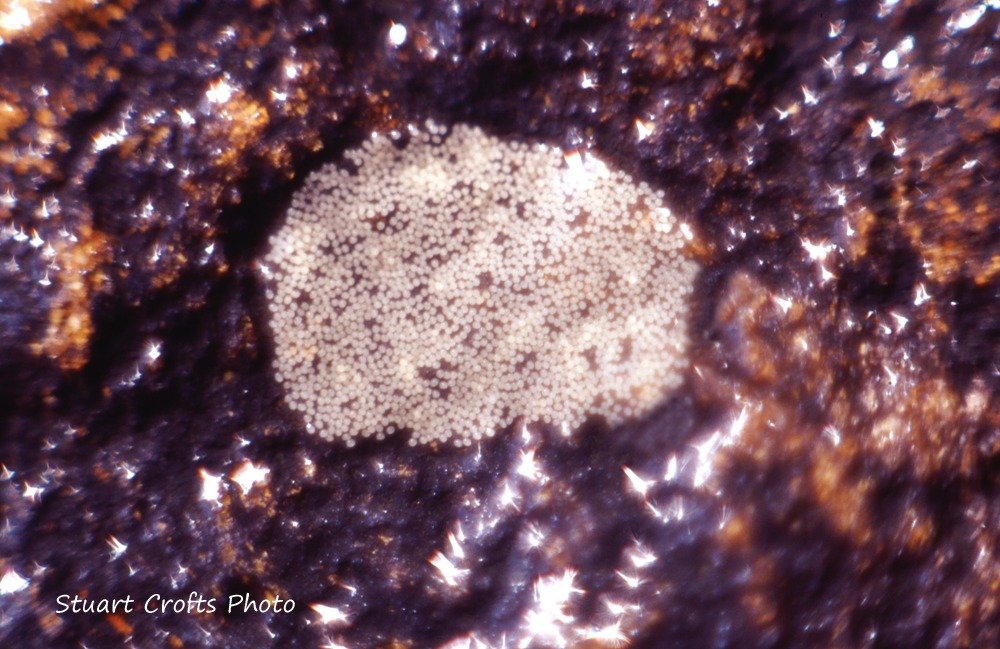
Aquatic insect eggs example (Baetis species)
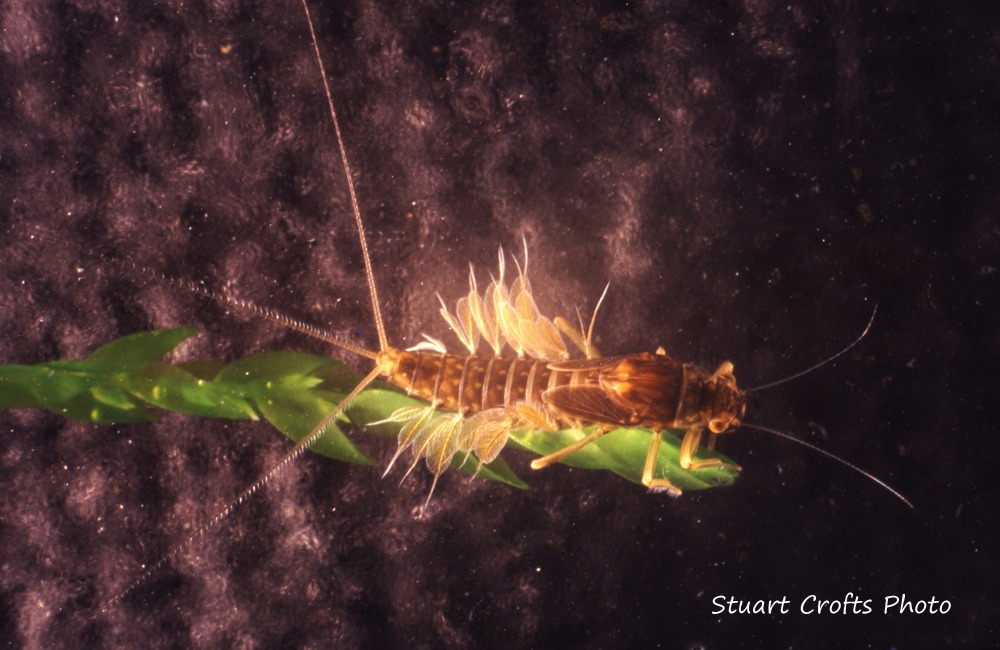
Small mayfly nymph (Leptophlebiidae family)
Some (e.g. midges and caddis) have a "pupa" stage where the body-parts are re-organised to become closer to the adult body-plan. In fact, when caddis flies pupate and then move from the riverbed to hatch - they are known as "pharate adults" (although those adults on the way to the surface are often mistakenly called "caddis pupae").
In fact the pharate adults are fully-formed adult flies which are covered in a kind of membrane which provides them with a temporary oxygen supply to get them to the surface - where a different system (of "spiracles" and "tracheae") will let them breathe air! The important things for you to know are that Caddis flies can look a little bit like moths and there are hundreds of different species. PLUS:
The pharate adults in almost all caddis species zoom about like crazy just under the surface as they hatch - this is another reason that "dead drift ain't the only game in town". When it comes to caddis and dry fly fishing for trout - actively "skating" a fly can be the key to success.
No matter what family or species, the adult, flying insect hatches from either the nymph or pupa...
Some insects hatch at the surface of the water. Those surface-hatching insects (like mayflies and midges) still need to get through the surface film - a task that would be the equivalent of you breaking through your kitchen table! Thanks to Stuart Crofts, I now know how they achieve this incredible feat...
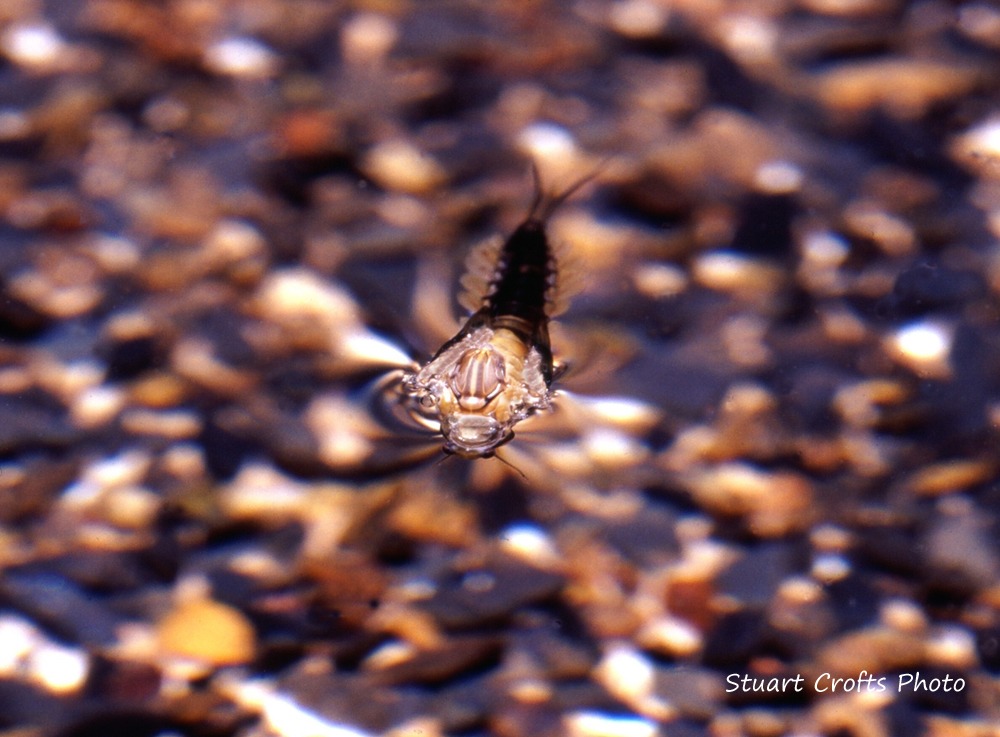
A large dark olive "emerger": The water-loving cells glue the nymph to the underside of the surface film - then the water-repelling cells "part" the water molecules to make an escape hatch for the adult fly to climb out of. In the process, they disconnect their gills and start using their lungs!
Their trick (which you can see in action above) is to have the nymphs/pupae "glue" themselves to the underside of the surface-film of the water using special "water-loving" cells on their thorax. That gives them something to pull on (otherwise if they just pushed up against the surface, they'd simply bounce off).
The second part of the trick is to use waxy water-repelling cells towards the centre of the "anchoring" ring of water-loving cells. Those waxy cells push apart the water molecules to make an "escape hatch" for the adult fly to push through as they escape their larval/pupal skin.
During that struggle to break through the surface, the insect is known as an emerger. This is an incredibly important lifecycle stage when you are dry fly fishing for trout. It is at this point that the flies are least likely to escape - and trout latch onto them as they are glued half in/half out of that surface film.
Other species (e.g. large stoneflies), crawl up onto rocks, logs or plant-stems as nymphs - and then split their skins to allow the adult fly to crawl out. However, the resulting adults may crash-land on the water during the mating scramble - or the females will return to the water to lay eggs. So they can still create viable targets for the dry fly angler to imitate.
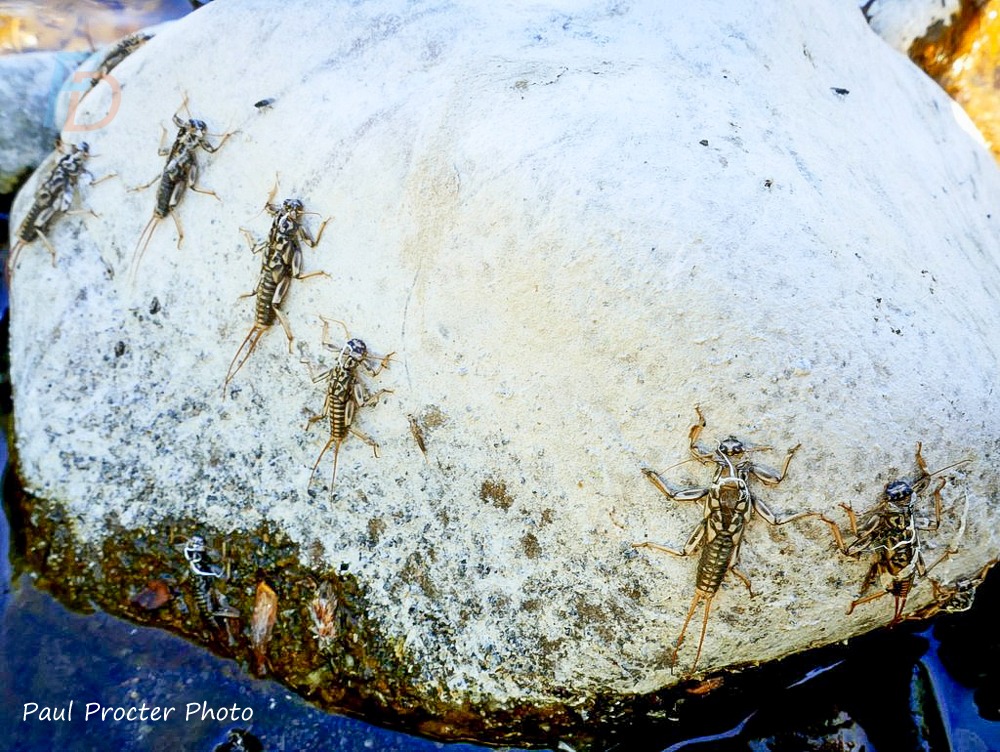
Stonefly "shucks" or nymph-skins left behind after the adults have shed them and flown away
The mayflies (or upwing flies) are unique in the insect world - because they have TWO adult stages. The first stage is called a "dun" by anglers - that is what hatches out from the water surface. Then those drab duns fly to the nearest vegetation so that they can moult again to become the much more sparkly and showy "spinner". That is the sexually-mature form which forms the dancing mating swarms before the females return to the water to lay eggs.
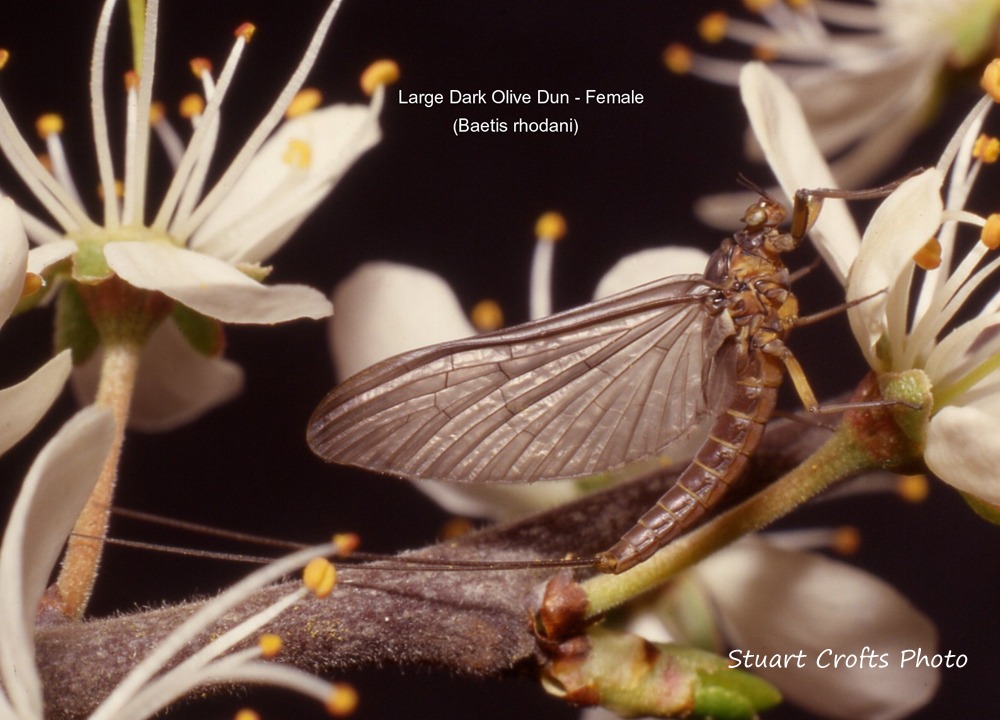
Example of a "dun" (Baetis rhodani)
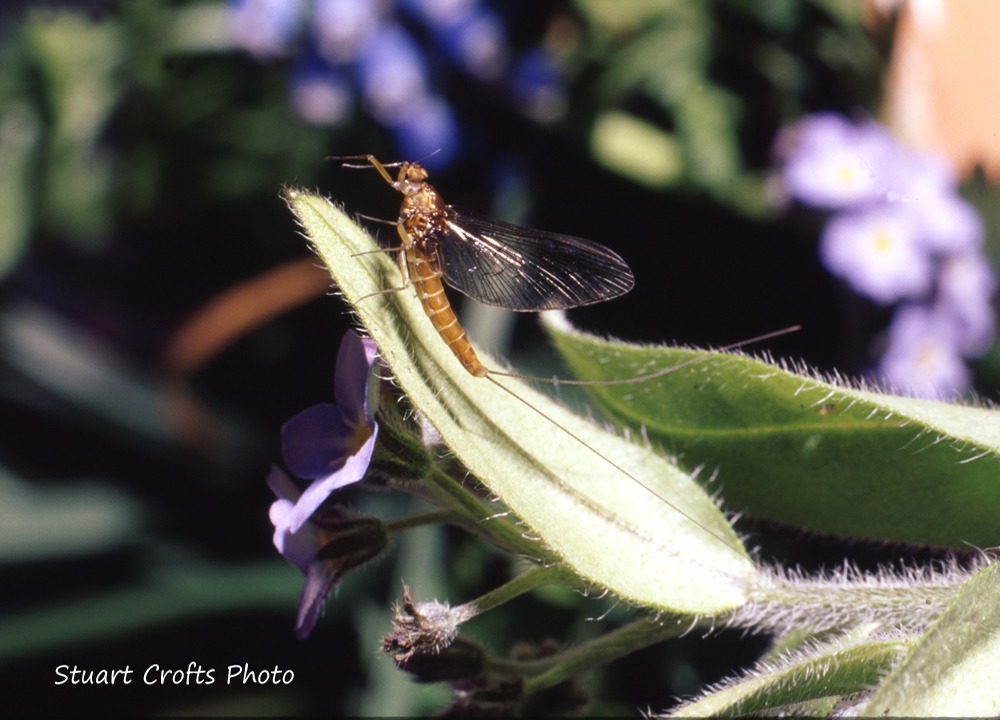
Example of a "spinner" (Baetis rhodani)
Some lay eggs on the surface of the water before dying (and becoming a "spent spinner"). Others (including Baetis species of upwing flies) crawl down vegetation, rocks or bridge-footings so that they can lay eggs on the underside of rocks on the riverbed. The "spent spinners" of those species are - therefore - washed along the riverbed (and not the surface).
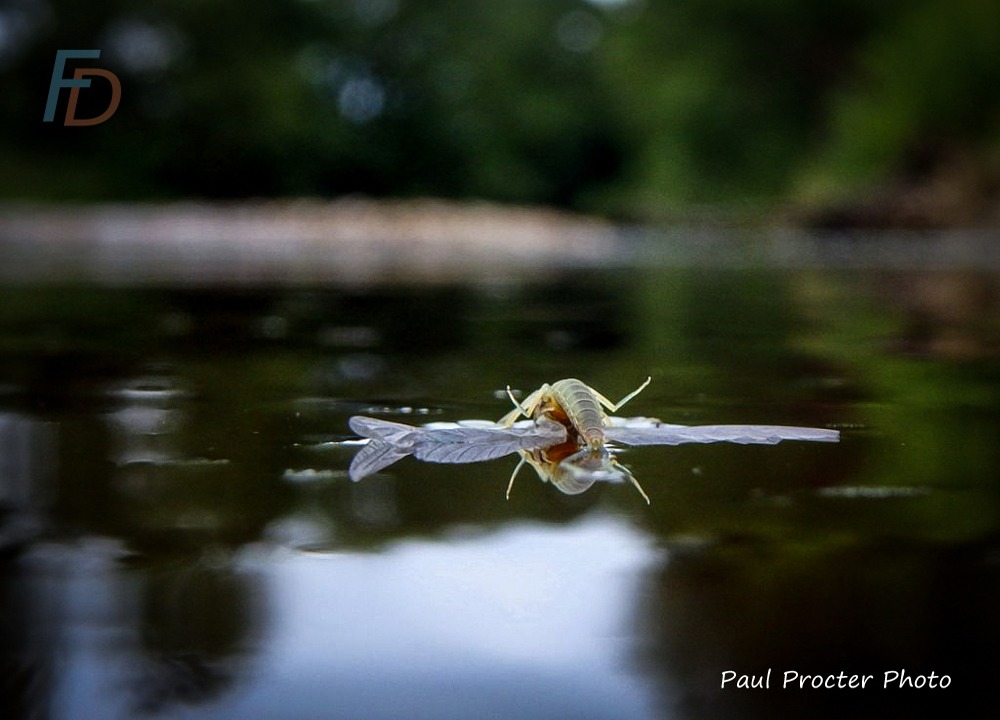
Surface egg-laying species spent spinner
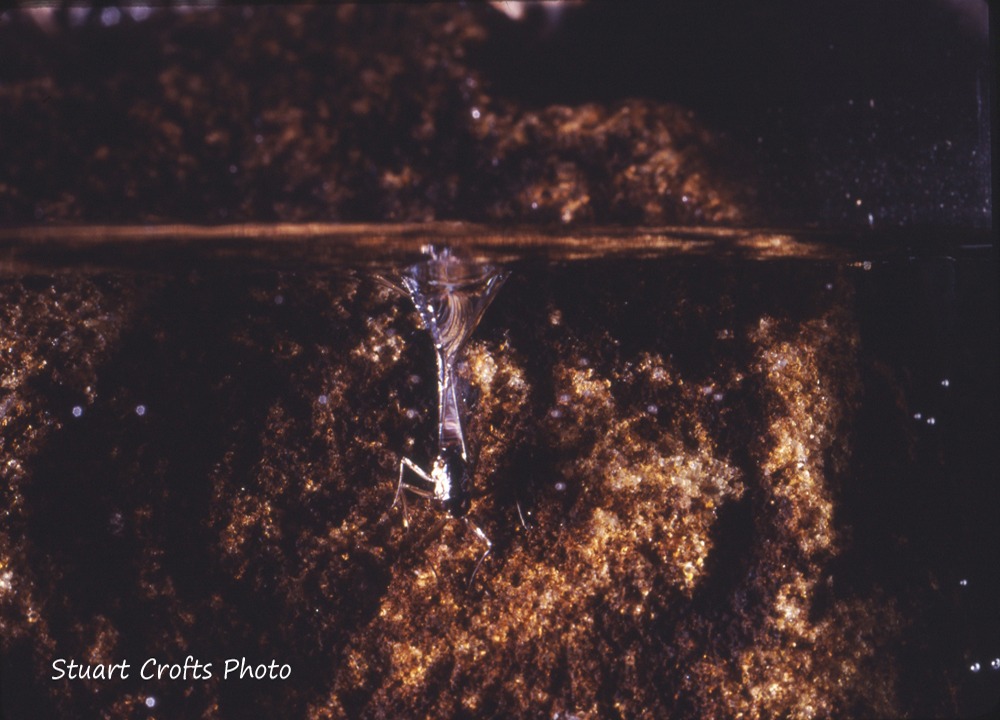
Female Baetis rhodani spinner crawling underwater!
If you can't yet recognise the various types of insect - take a tiny fine-mesh aquarium net and stand downstream of rising fish will let you sample what they fish are eating. Just hold the net in the surface for two or three minutes and then look in the mesh to see what has washed downstream. You can also watch to see if flies are popping through the surface and flying away! Matching the size - and roughly how the prey is floating in/on the surface will key you in without needing to learn Latin names right away.
THIS IS JUST AS IMPORTANT WHEN YOU HAVE LEARNED WHAT THINGS ARE CALLED - BECAUSE YOU SHOULD ALSO KNOW WHAT EACH SPECIES DOES - a vital part of your imitation!
Knowing a bit about the above information reveals that there are several lifecycle stages that the fly angler can imitate - depending on what the trout are feeding on at the time.
As well as differences in whether those flies are "on", "in" or poking half in/half out of the surface film - there are differences in how each of those lifecycle-stages move...
Dead, spent spinners floating on the surface are completely at the mercy of the current - and drift exactly in accordance with the flow
Living life-stages of river flies and terrestrial insects can wriggle, struggle and sometimes move very quickly across the surface
These Affect Your Presentation Options!
When dry fly fishing for trout - you will do best by imitating (and sometimes exaggerating) the behaviour of the prey. This is the reason that DEAD DRIFT is ESSENTIAL for SPENT SPINNERS.
ALWAYS REMEMBER THAT YOU CAN "DOCTOR" YOUR FLY (BY TRIMMING, PLUCKING OR CHOOSING EXACTLY WHICH PART OF THE FLY TO APPLY FLOATANT TO) AND/OR CHANGE HOW YOU MANIPULATE IT TO CREATE THE RIGHT IMPRESSION.
AS LONG AS THE SIZE IS ACCEPTABLE - THE "WRONG" FLY DOCTORED AND PRESENTED IN THE RIGHT WAY WILL BE VERY SUCCESSFUL.
Example Fly Designs
I've provided some suggestions to help you match up some of the types of bugs you'll find on stream to artificial patterns below. Always bear in mind that there's more than one way to skin a cat - in other words, several patterns can imitate the same natural fly! There's no such thing as a hatch of "Parachute Adams" or "F-Flies" - but there are small olive mayfly and needle-fly hatches...
Before I share those suggested flies, it is worth understanding the difference between the different FUNCTIONAL DESIGNS of Dry Flies. This includes the difference between a "Parachute Hackle" and a conventional hackle. Because more of the fibres in a parachute hackle will lay across the water (instead of poking down into it), it is often easier to keep that style of fly afloat for long periods.
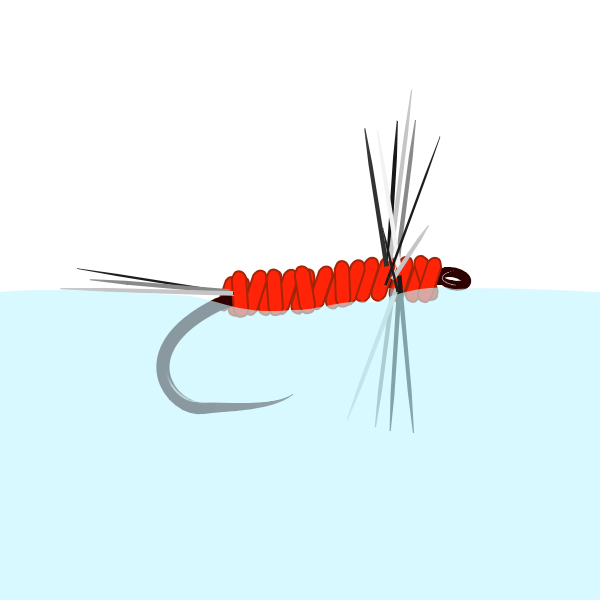
Conventional "Collar" Hackle
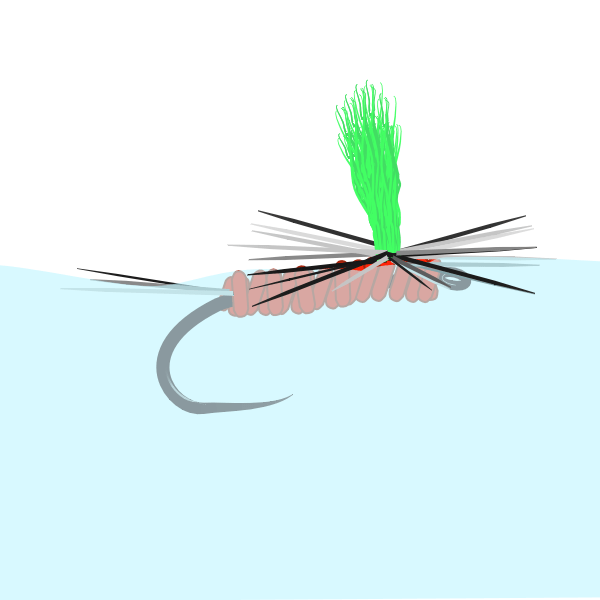
Parachute Hackle (wrapped round wing-post)
Both of the above patterns probably best represent "duns" or adult insects (or at least are a tolerably-good imitation of that situation). For more pronounced "emerger" imitations, a dropped/angled abdomen is a powerful trigger. The shape of the hook and position of the part of the fly which makes the fly float can control this. The buoyant, fuzzy "CDC" (cul-de-canard) feathers from close to the preen gland on ducks is very good for this purpose (as well as curved-abdomen parachute hackle flies in the "klinkhåmer special" mould). See below for examples in the "Abdomen Angle" section...
There is a myth that conventional "collar" hackle flies will "stand up on their hackle points and keep the body of the fly off the water - more like a real "dun" (just-hatched adult mayfly).
While you might get a few seconds of that happening on your very first cast - the body of the fly will be on/in the surface film for all subsequent presentations.
Abdomen Angle: Functional Emerger Flies
I often hear anglers talk about "emergers" with tungsten beads or other well-sunk wet fly or nymph patterns. What they are talking about is a fly with obvious legs or hackles. That impression isn't quite right though (completely-mature adult flies that have been drowned and well-sunk have legs and wings sticking out all over the place. That has nothing specifically to do with the process of emerging from the nymph).
The key detail that the word "emerger" is telling you is that the adult fly is struggling half in/half out of its nymphal "shuck". Because the word "emerger" is used by dry fly/surface-pattern anglers, we are ONLY talking about those species that emerge AT THE SURFACE OF THE WATER. This has special significance when dry fly fishing for trout - because trout LOVE a sure thing. Of course, because we fly anglers love a good argument - there are plenty of dry fly anglers who class emergers as nymphs (and vice versa).
That seems to get too close to a Dr Seuss butter-side up/butter side down parody of nuclear arms races - and that is me veering dangerously off-course...
While an emerger is poking through the surface film it can't swim away and it can't yet fly away. That is a window of vulnerability for a visual predator like a trout.
Let's look at the amazing image captured by Stuart Crofts below to LOCK IN that image of vulnerable prey:
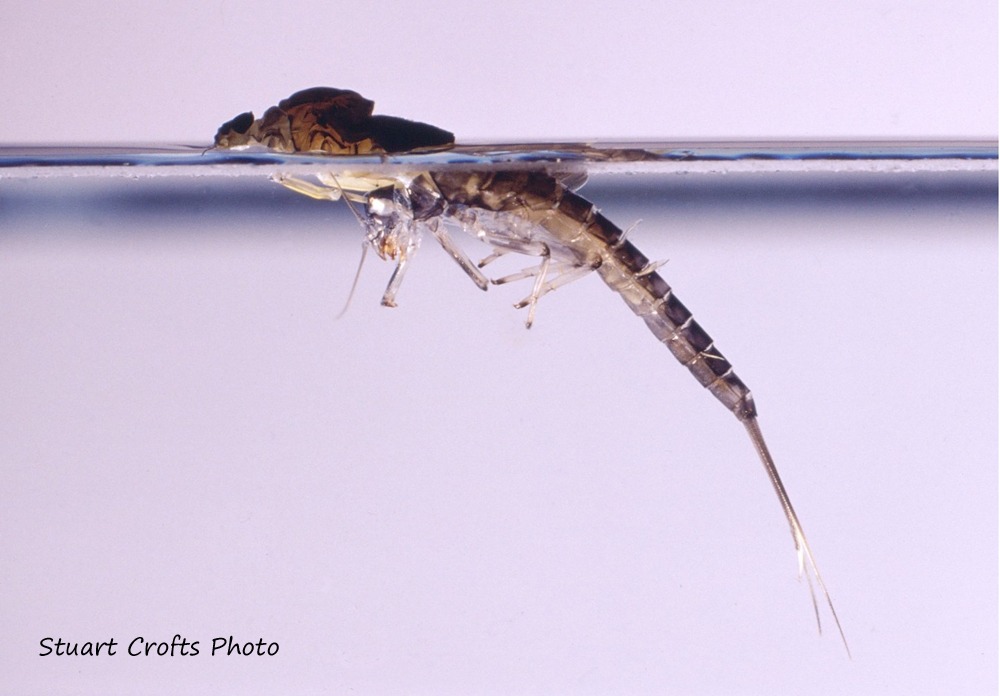
This is the window of opportunity you want to imitate with your "emerger" patterns
Depending on the temperature/humidity it can take flies a bit longer to struggle free of their nymphal "shuck" (skin). On other days (or for certain species) they might be able to emerge incredibly quickly - but weather conditions might slow down how quickly they can get their wings working. Those are the kind of things that influence whether trout are eating duns or emergers.
Further on in this article I'll give you some clues to look for in the way that trout rise which can indicate whether they are eating duns or emergers.
Before we get to that, check out another two FUNCTIONAL choices for fly design (this time specifically for emergers):
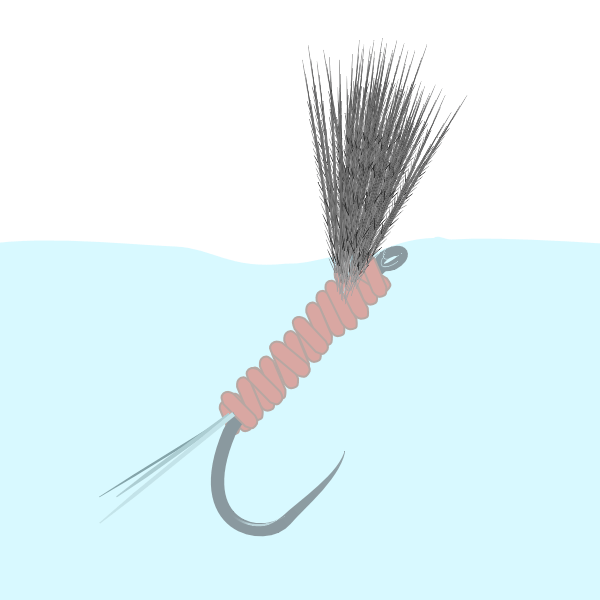
A "shuttlecock" style emerger (abdomen hangs down steeply)
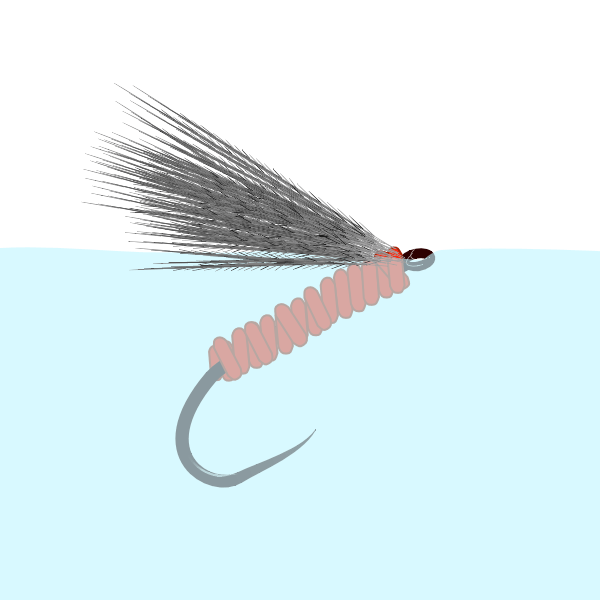
"F-Fly" style emerger (abdomen hangs at shallower angle)
There are many ways to achieve a hanging abdomen for an emerger pattern (see photos of different parachute dressings below for examples). The two diagrams above show options using cul-de-canard feather (which is buoyant more because of its structure of thousands of tiny, fine air-trapping barbs - rather than being coated with preen-gland oil as popular myth would have it).
MANY dry fly floatant chemicals will wick those fine barbs together and make them into a matted, sinking mess.
However, compounds such as Loon Aquel will actually help cdc float for longer. We have no affiliation with Loon, it's just what we use - and you can experiment to find others that also work. The other product that is useful with cdc is hydrophobic fumed silica (one commercial brand of this is Frog's Fanny - again no affiliation). This fine powder actively drives out moisture when dabbed onto cdc with a brush applicator - and it is a game-changer for reviving cdc flies such as the famous Slovenian F-Fly created by Marjan Fratnik.
If you're caught out without fumed silica powder, do this:
You can then apply a thin film of Aquel (or similar) for maximum float-time
The main take-home message from the "emerger" diagrams above is that you can tweak the abdomen angle of your artificial fly to imitate characteristics of different natural insects.
E-book of Tactics to Make the Most of your Fly Patterns
Another advantage of the Free e-book and 5x best kept secrets email course combo is the way it helps to make the best use of any fly patterns you want to present on the river:

Suggested Dressing Styles Matched to "Bread and Butter" Natural Insect Species:
Please DON'T be restricted by these patterns - they are all just examples of design principles. In the same way, don't dismiss them because another fly that imitates the same thing has a more famous name...
Also - size them to suit your local insects; that's why I haven't put hook sizes on these! Purely for comparison, the Griffiths Gnat is a size 20.
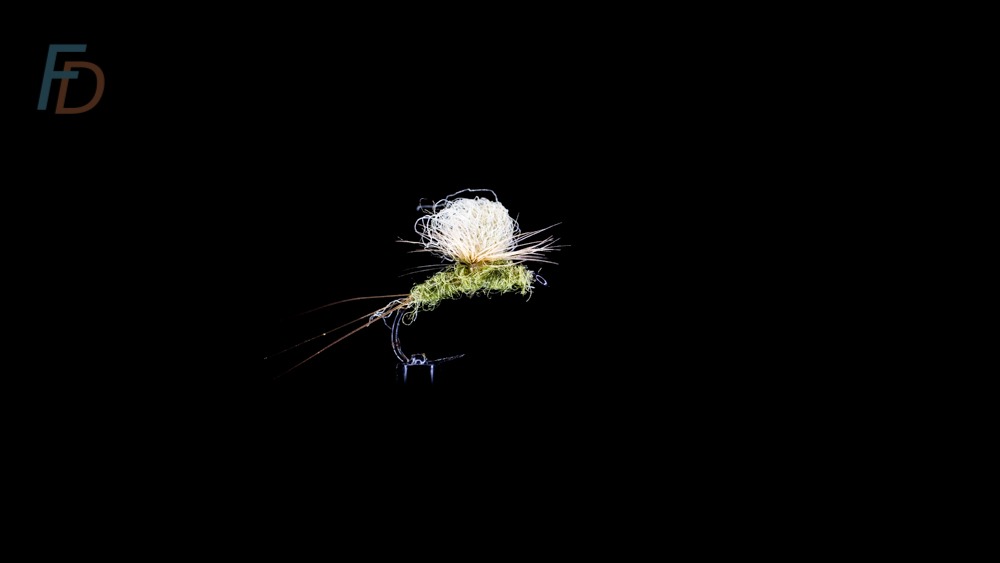
Small olive mayfly dun (parachute, flat floating - grease the tails to get them to dimple the surface film and keep the fly flat)
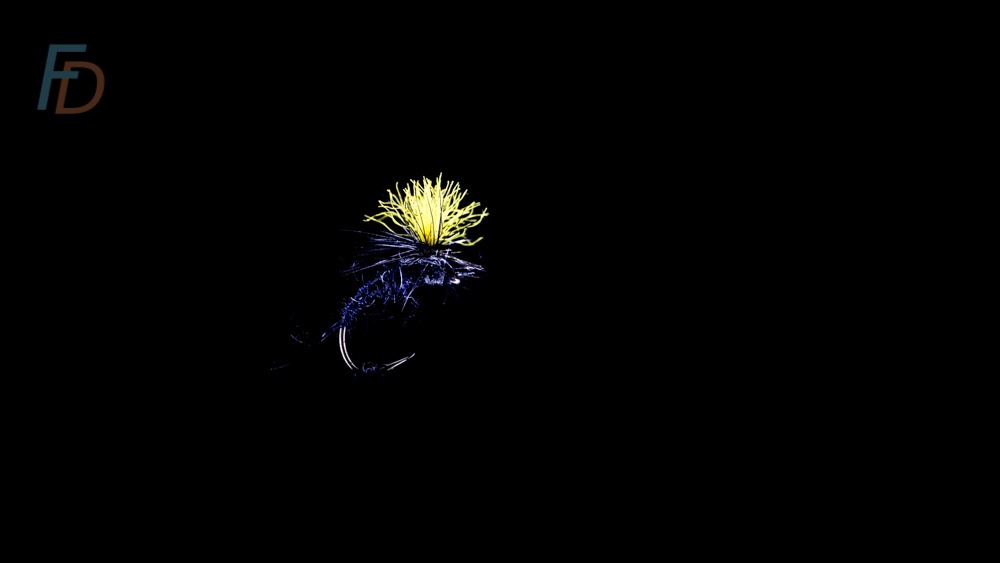
Emerging midge/dropped abdomen terrestrial (parachute in the klinkhåmer stable - one of thousands of variants on the original)
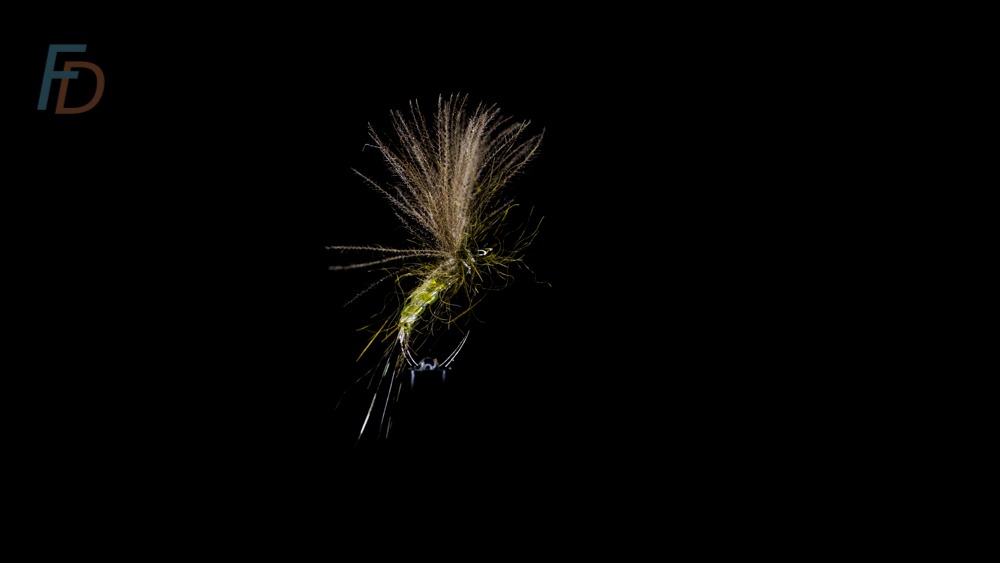
Small olive mayfly shuttlecock emerger
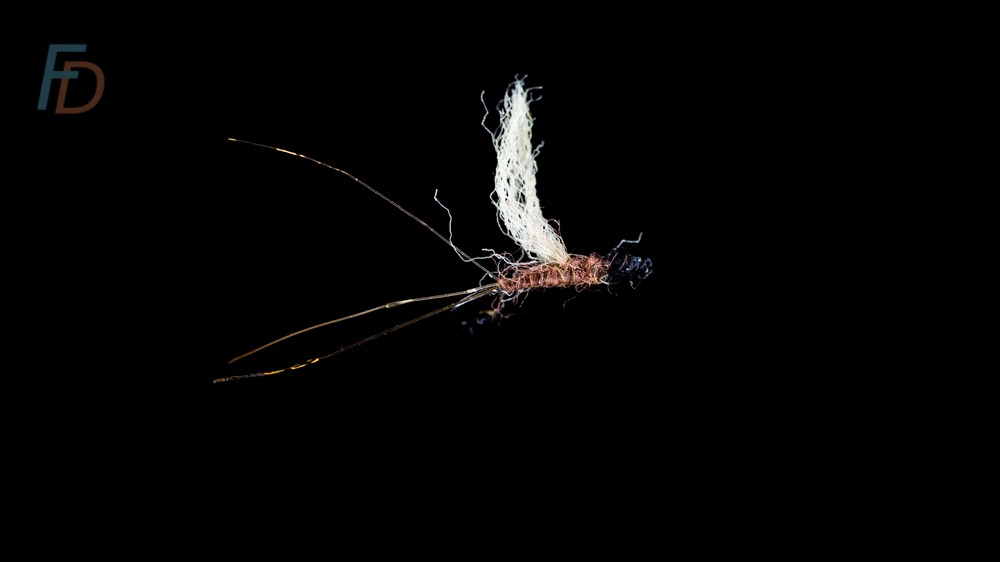
Chaotic spent spinner (single wing and tails I've chewed in my teeth) after Stuart Crofts' ideas and patterns.
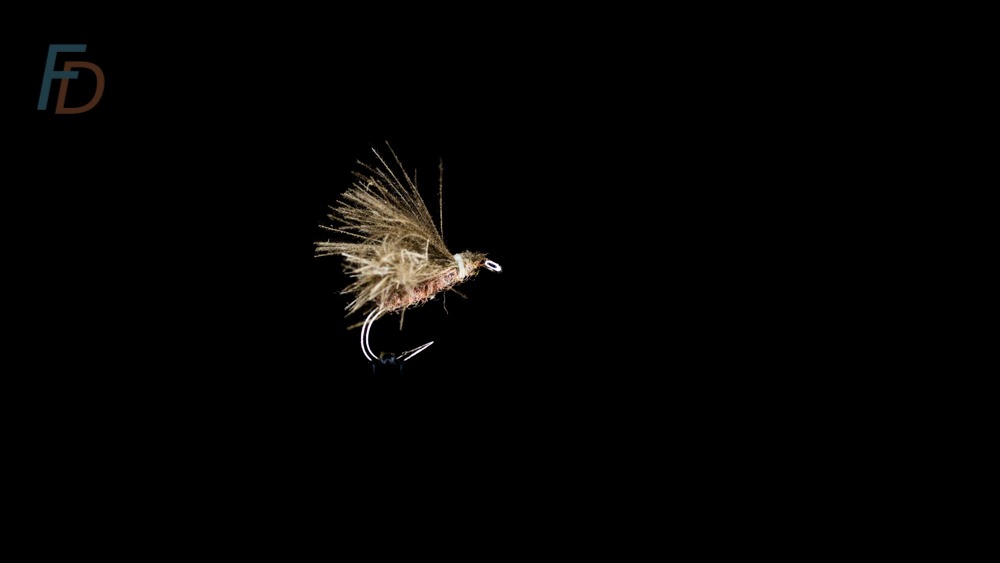
Small brown F-Fly for tiny caddis and stoneflies in the "needle fly" and "willow fly" families. Will also do for olive duns and almost any small insect!
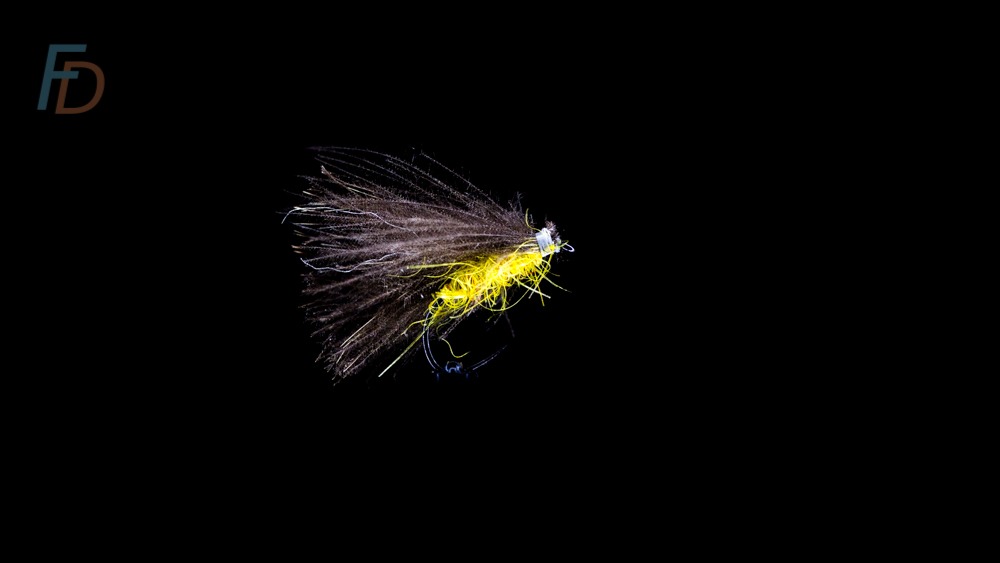
Play around with body colour and sizes for larger stoneflies and caddis (though see "Local Specialities" for big stoneflies!)
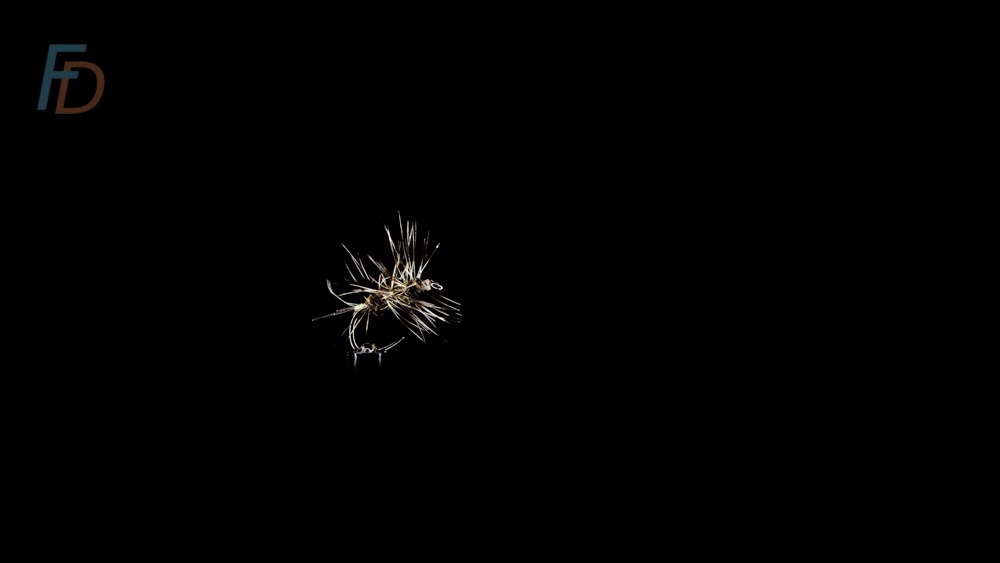
Adult midge - Griffiths Gnat ("palmered" body hackle)

Detached, furled-body cdc caddis (body made from twisted synthetic dubbing)
Local Specialities
Where you have famous and characteristic hatches at certain times of the year, there will probably be local fly shops with great patterns available. For example there might be a specific hatch of lovely big stoneflies like the salmon fly in your river.
Similarly, larger mayfly imitations (such as greendrakes) are useful for those specific hatch periods in the river where they occur.

To get really extreme, check out our guide to "mouse fishing for trout" - surely the craziest "hatch" of all to imitate with a dry fly?
These local “speciality” hatches that you may need something fairly specific to match. With all that said, there is also a lot of value in having a selection of simple, collar-hackled dry flies in sizes and colours to match a range of natural insects from midges up to the medium-sized upwing species.
Quick Secret to choosing how heavily to dress a fly:
In rough water, the fish will tolerate (and may even prefer) a larger and/or more bushy dressing. In shallow, flat water, go sparser and smaller (even a little smaller than the naturals sometimes).
Dry Fly Fishing For Trout: Almost Unknown Core Principles
Before we even get into what most anglers consider the fundamentals of dry fly fishing for trout (such as “upstream” versus “downstream” schools of thought), I want to introduce what I think are true basic principles.
Prey image
The size of the fly is probably the single most important thing – most fly designs feature a body that is longer than it is wide with “stuff that sticks out” to look something like legs, wings and maybe tails. Where and how a dry fly sits in the film is another key element – but even the “wrong” fly can often be made to float in something like the right way (either by trimming bits or being selective in exactly which bits of your fly you apply floatant to - as mentioned).
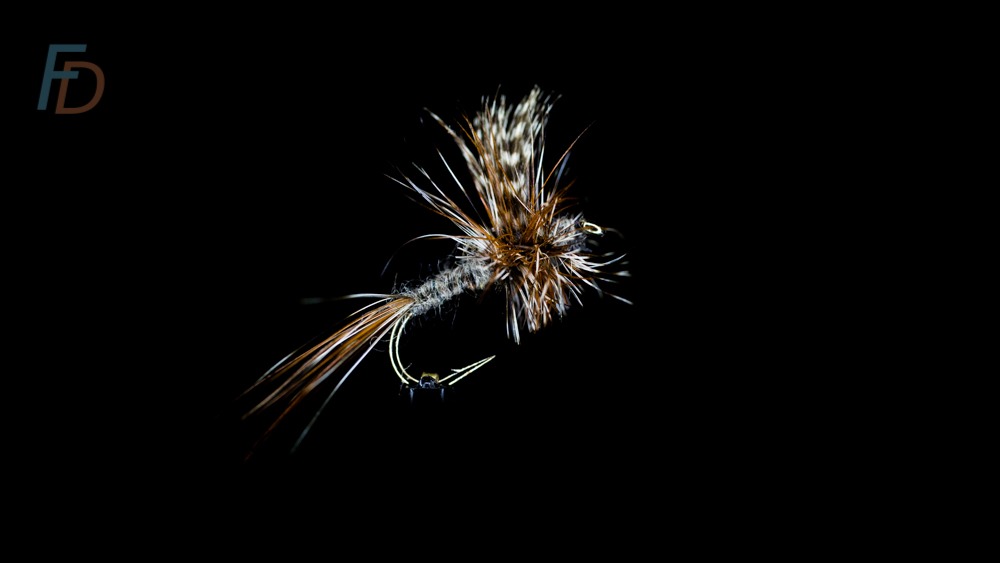
This shop-bought dry fly came with the hackle already trimmed on the underside - to help it "sit" a certain way in the surface.
After many years of actively experimenting on this, I am convinced that photo-realistic flies can often perform worse than impressionistic flies.
As long as those impressionistic patterns suggest key elements in a fly (a silhouette that roughly matches that of the natural fly), and behave in the right way, they will trigger the feeding response in a trout’s brain...
Impressionistic flies are usually easier to cast accurately (and without acting like a propeller that spins up your tippet into an impossible knot).
Simple Rules
Side-note, behavioural ecologists refer to the “search image” used by visual predators to recognise prey. Basically, predators use a greatly simplified set of "rules" to identify "food". Even something as basic as the ratios of length to width and the plane of movement of a "stick-drawing" or match-stick have been shown in experiments to be more than enough to trigger feeding…

The stick figure on the left is a bit like the simple "search image" rules used by trout to recognise food. Taking the time to create the extra details on the right is not necessary to trigger a feeding response (so, in fishing terms, you might as well tie a larger number of simpler flies)
It’s worth bearing the above scientific data in mind when you are being told that you need the correct number of turns of rib on your dry flies “otherwise the fish will refuse it”.
Applying to your own waters
For your stream it is as well to know the basic size of river flies that hatch from (or terrestrial bugs that fall onto) the water’s surface at each stage of the season. Don’t rely on the calendar too much though. Again, it is much better to observe what is hatching (and what is being taken by the fish more importantly).
The selection of “suggestive” flies in the photos above are tried and tested. They are also often less “rigid” and “robotic” when fished (compared to super-realistic dressings). You will have plenty of time to experiment with and settle on your own favourite selections to cover your own waters.
Casting Tips when Dry Fly Fishing for Trout
Main choices for landing your fly
#1 Fly first (angled-down cast)
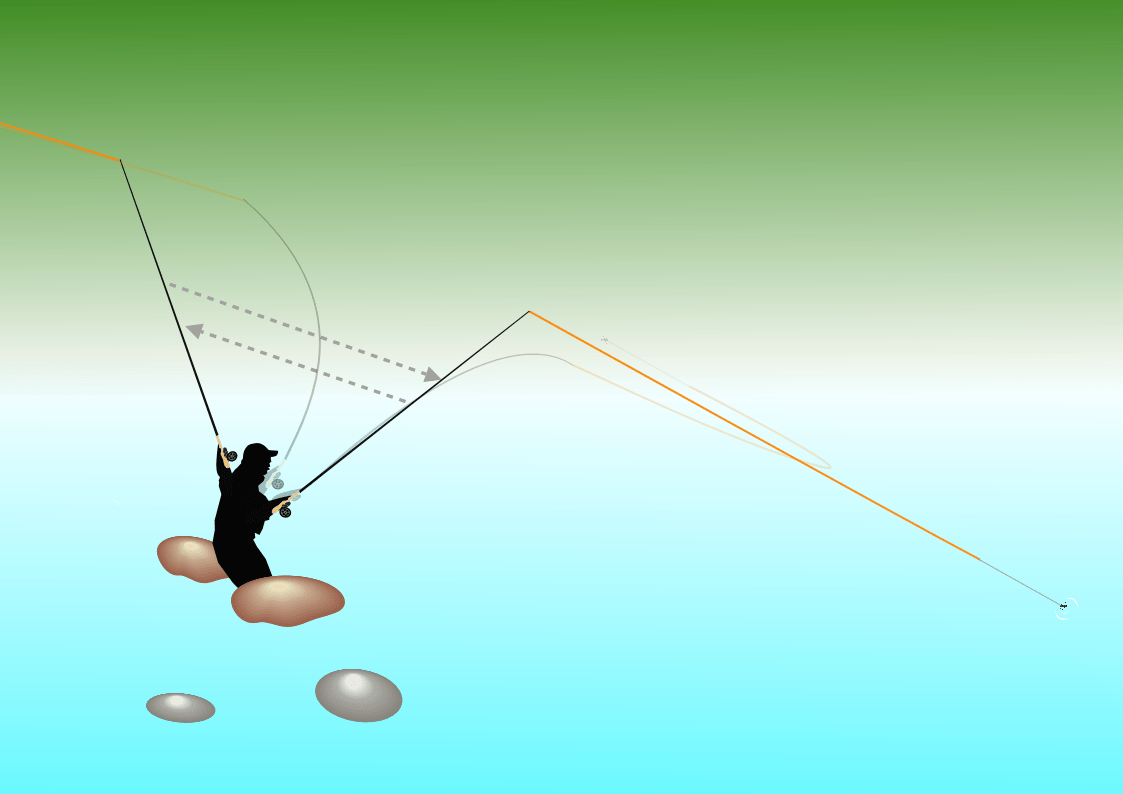
Prominent in some Italian schools of casting – this has the advantage of making the fly splat down BEFORE your fly line lands on the water. By drawing the trout’s attention to your fly (rather than to potential danger), you can get a split-second “reaction bite”. For this reason, it is best to aim directly at the point where the trout is LOOKING at the water before taking natural flies from the surface. In other words - in shooting terms you would say to use less "lead" as we will discuss below...
#2 Land softly – after the fly line
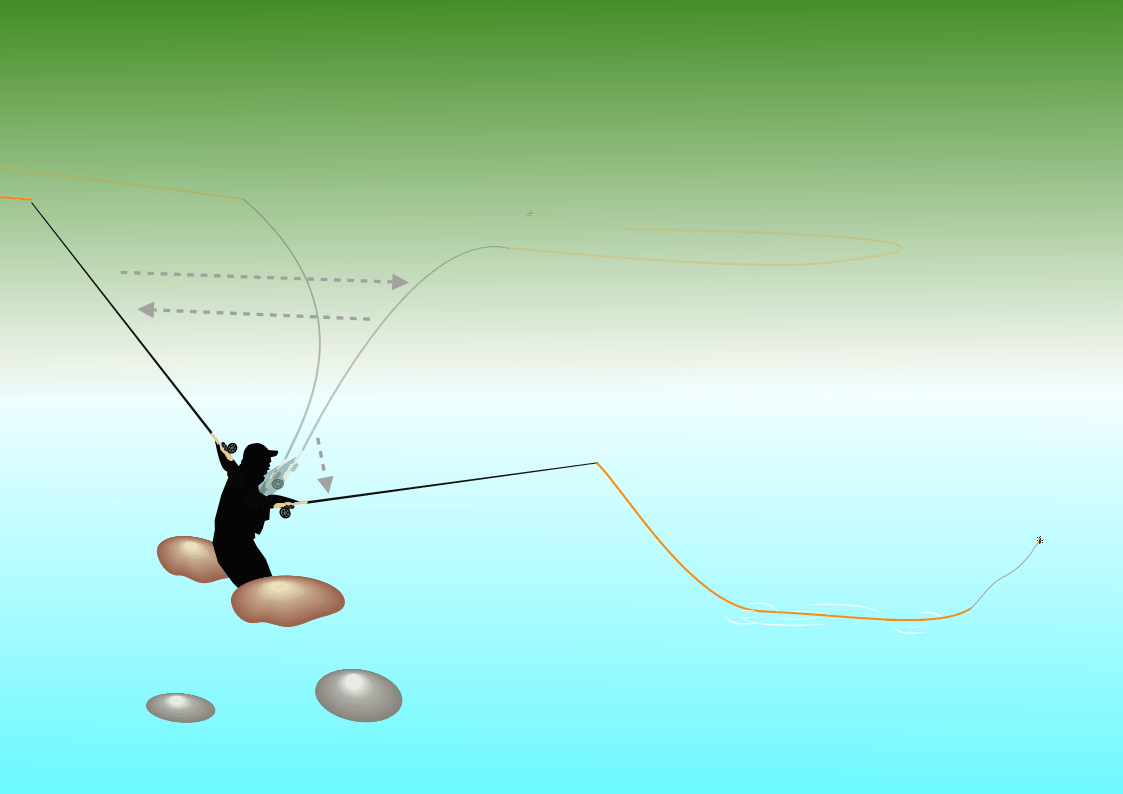
For this (more conventional) style, your casting loops will be parallel to the water and the fly will drift down more slowly onto the surface. It is best to separate the splash of your line landing from that of your fly by using as long a leader as you can cope with in the conditions.
As with any kind of fly fishing, try to hold as much line off the water as possible. As well as making your hook-sets more effective, it also helps keep your fly line out of nagging currents. The more that conflicting currents pull your line around, the sooner any slack in your leader will disappear and make your fly drag around weirdly. That tends to result in unnatural and unattractive (to fish) movement of your fly.
Tuning your Rigs for Soft Landings after Casting
When starting out, try using around 9’ of tapered leader and at least 2’ of level tippet in the 5x or 6x (~4.5-lb or 3-lb). Working up to total “leader + tippet” length in the 15’ to 18' range is particularly helpful for this style of dry fly fishing. If you’re fishing tiny midges in size 18 or 20 and below, it is certainly worth thinking about 7x tippet for those.
As an alternative to long leaders (if you really struggle to cast and control them), it may be worth trying the lightest fly line that you are comfortable with and using a really light furled leader made from Benecchi fly tying thread.
With this you can use a short (4' to 6’) furled leader with 3’ of tippet and still land the fly and leader on the water quite softly. This is an approach favoured by Stuart Crofts and he uses it to great effect.
Amount of “lead” - vital to successful dry fly fishing for trout
You need to assess the Holding Depth of the fish:
These diagrams will help you lock in a good benchmark for lead-distances when dry fly fishing for trout:
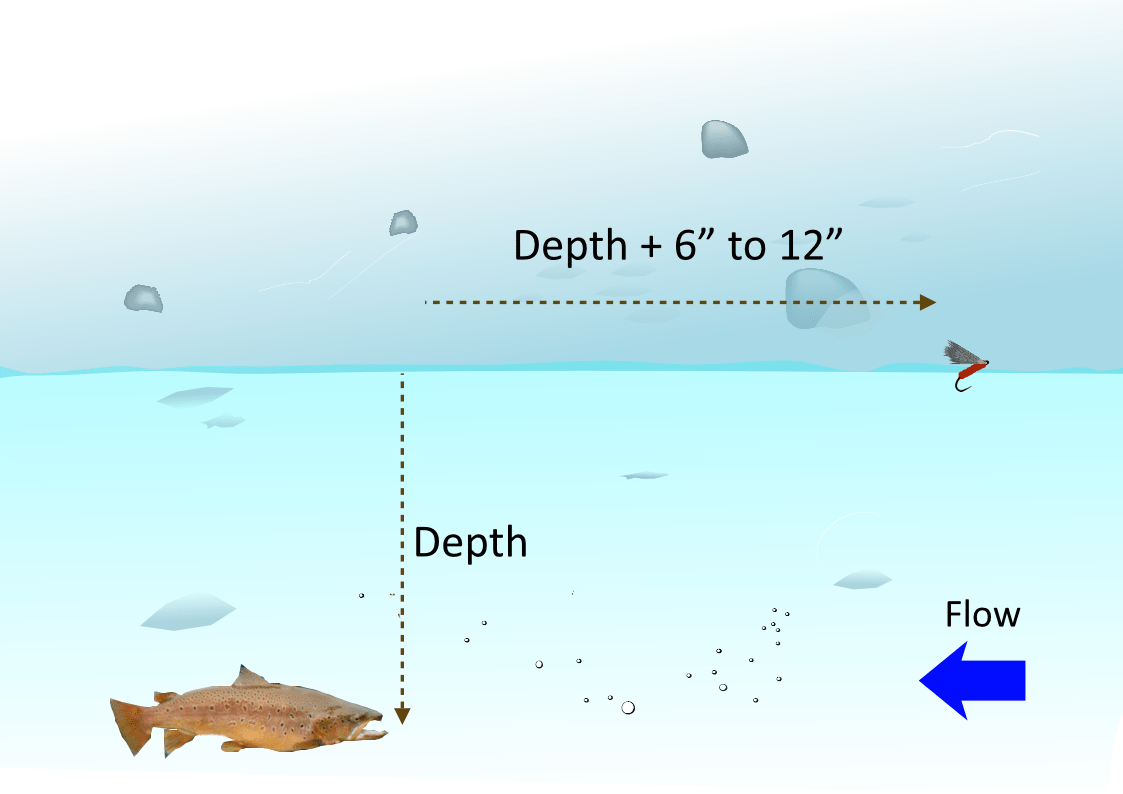
Dry fly "lead" for deep-lying Fish
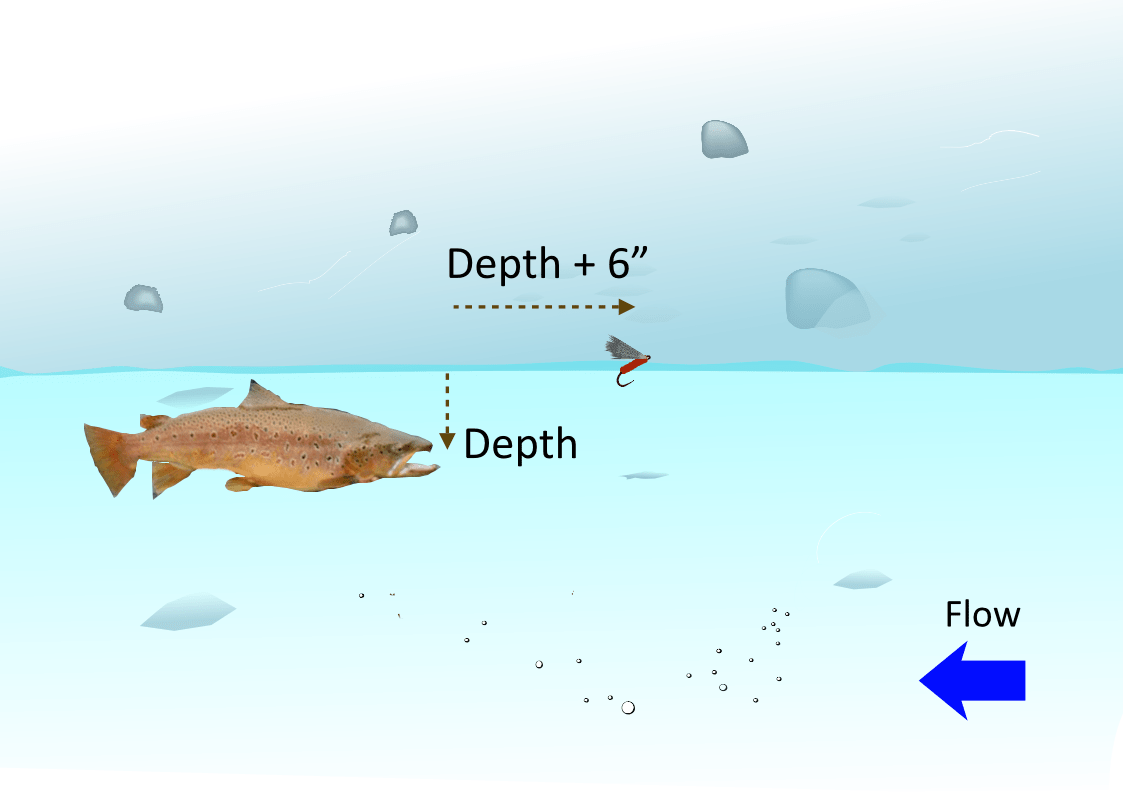
Amount of lead for surface-lying fish
If nothing else, understand that you have to cast further upstream of a deep-lying fish. Trout can hang at almost any height in the water column. If the water is clear enough, they will rise from down near the riverbed during the warmer months. Sometimes they might be hovering just below the surface.
Casting Angles, Line Management & Timing
Depending on where in the world you’re fishing, there’ll be different rules on how you can cast. For some ultra-traditional clubs on – typically English Chalkstreams – you are only allowed to cast your fly at an upstream angle (i.e. the angler must be downstream of the fish).
To a non-angler (or to an angler transitioning to fly fishing from a different discipline), this must seem perversely restrictive. As a fly fishing “lifer”, I would tend to agree! I believe it reduces the scope for skilled anglers. That being said, a great deal of fly fishing’s enjoyment can be taken from immersion in its traditions and rich history. Having an upstream only rule does make it a bit simpler to stick to an etiquette of working upstream - and avoid anglers getting into conflict.
Whatever rules and restrictions apply, you still have the same overall aim.
The challenge is always how to get the fly over the fish’s head – WITHOUT the fly line landing near or passing over the fish
Fishing Upstream
Ironically, without difficult obstacles, the easiest option is an upstream cast (which is one reason it can stifle angling skills development). A basic rule of thumb would be casting approximately 30 to 45 degrees to the current (so that the fly and leader lands in a "lane" beyond the fly line).
If your cast is accurate enough, you’ll land the fly with the right amount of “lead” above the fish AND have enough separation between that fish and the splashdown of the fly line - like this; note the offset angle (short arrow) from directly upstream (the long arrow):
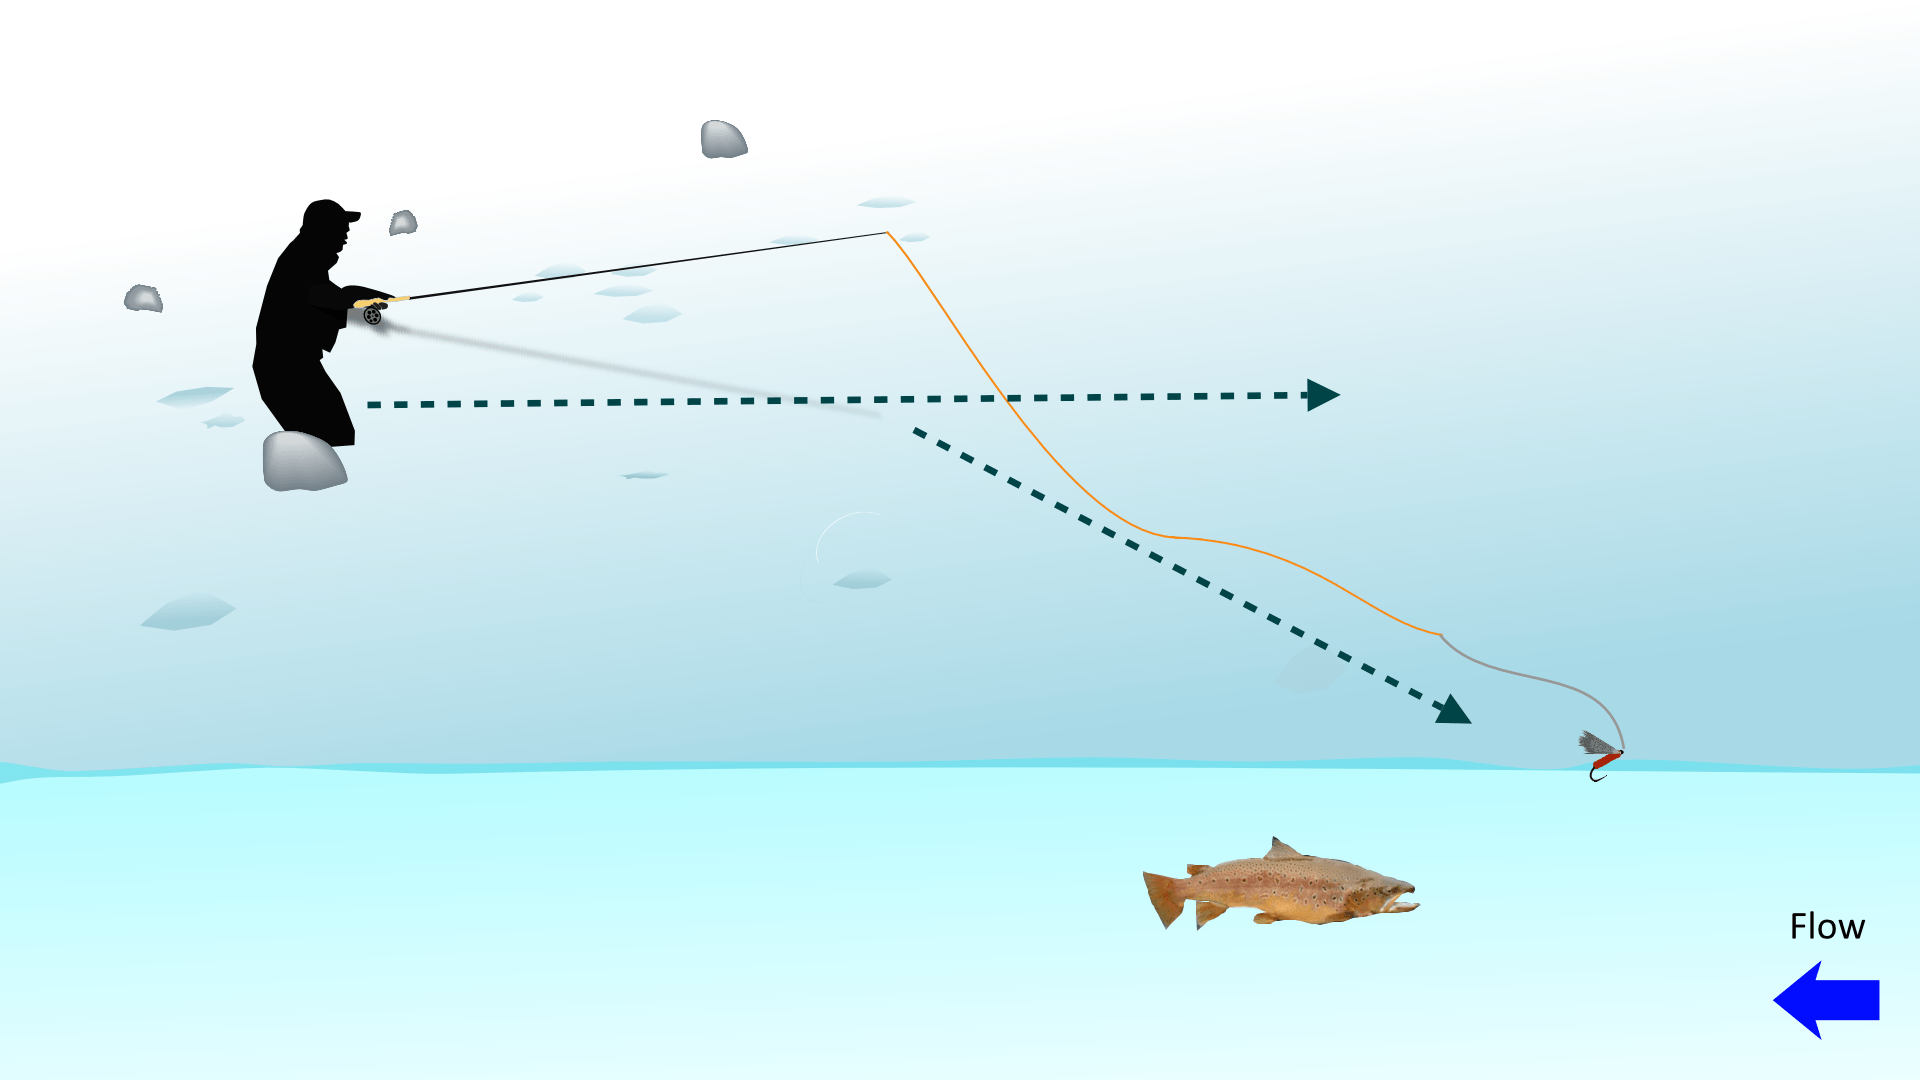
If you have a very long leader, you can cast almost directly upstream and avoid "lining" the fish. Normally, though, it is a safer bet to cast at a slight angle. This keeps the line and leader in a separate "running lane" from the feeding lane of the fish. However, in complex currents, straight upstream can be better...
Then it’s a case of recovering the slack in the line by either raising or tracking around with your rod tip at the pace of the current. If necessary, you can also retrieve line with your “non-rod hand” by stripping it through your “trigger finger” on your rod hand.
If the fish doesn’t eat your fly, allow it to drift a safe distance downstream and take in enough line that it won’t make a huge disturbance when you pick off into your next cast. Always start to lift your line slowly and smoothly – so it peels gently off the water as it escapes the surface-tension. SLOOSHING your line off the water will scare any self-respecting trout into the next county.
Downstream Dry Fly
Fishing downstream to spooky fish in shallow, flat water is a very tricky proposition. Get it right, though, and you can be rewarded with fish that other anglers are unable to catch. In a wild fishery, that can mean the biggest and wildest fish that have evaded capture for the longest time.
One reason for the potential effectiveness of fishing dry flies downstream are that the fish, by definition, gets to see the fly before any tippet, leader, fly line or rod.
Another significant advantage is the ability to avoid cross-stream drag and achieving a natural drift exactly in line with the current (without having to cast up and over the fish with your leader).
That is done by wading (again, where allowed) into a position that allows your rod tip to be directly upstream of the fish. Your rod tip is the ultimate anchor-point for your line.
If that anchor is to one side or the other of a particular corridor of current, there will be a tendency for your rig to arc towards it across the stream. Even if this effect is fractional, it can be enough to put fish off.
The proviso for using this approach is that you will need to very carefully (and often slowly) move into position above the fish. If you scare it before you cast, the game is up. Try to think of how you’d need to move if the fish was a rabbit grazing on a patch of open ground rather than a fish in water.
Parachute cast
An essential skill for fishing a dry fly downstream is the parachute cast (below). On the final delivery of your forward cast, instead of following the line down towards the water with your rod tip, gently draw/hold the rod tip up and backwards. With the rod tip finishing in a roughly vertical position, you can then track the natural drift of your fly downstream by lowering your rod at the pace of the current:
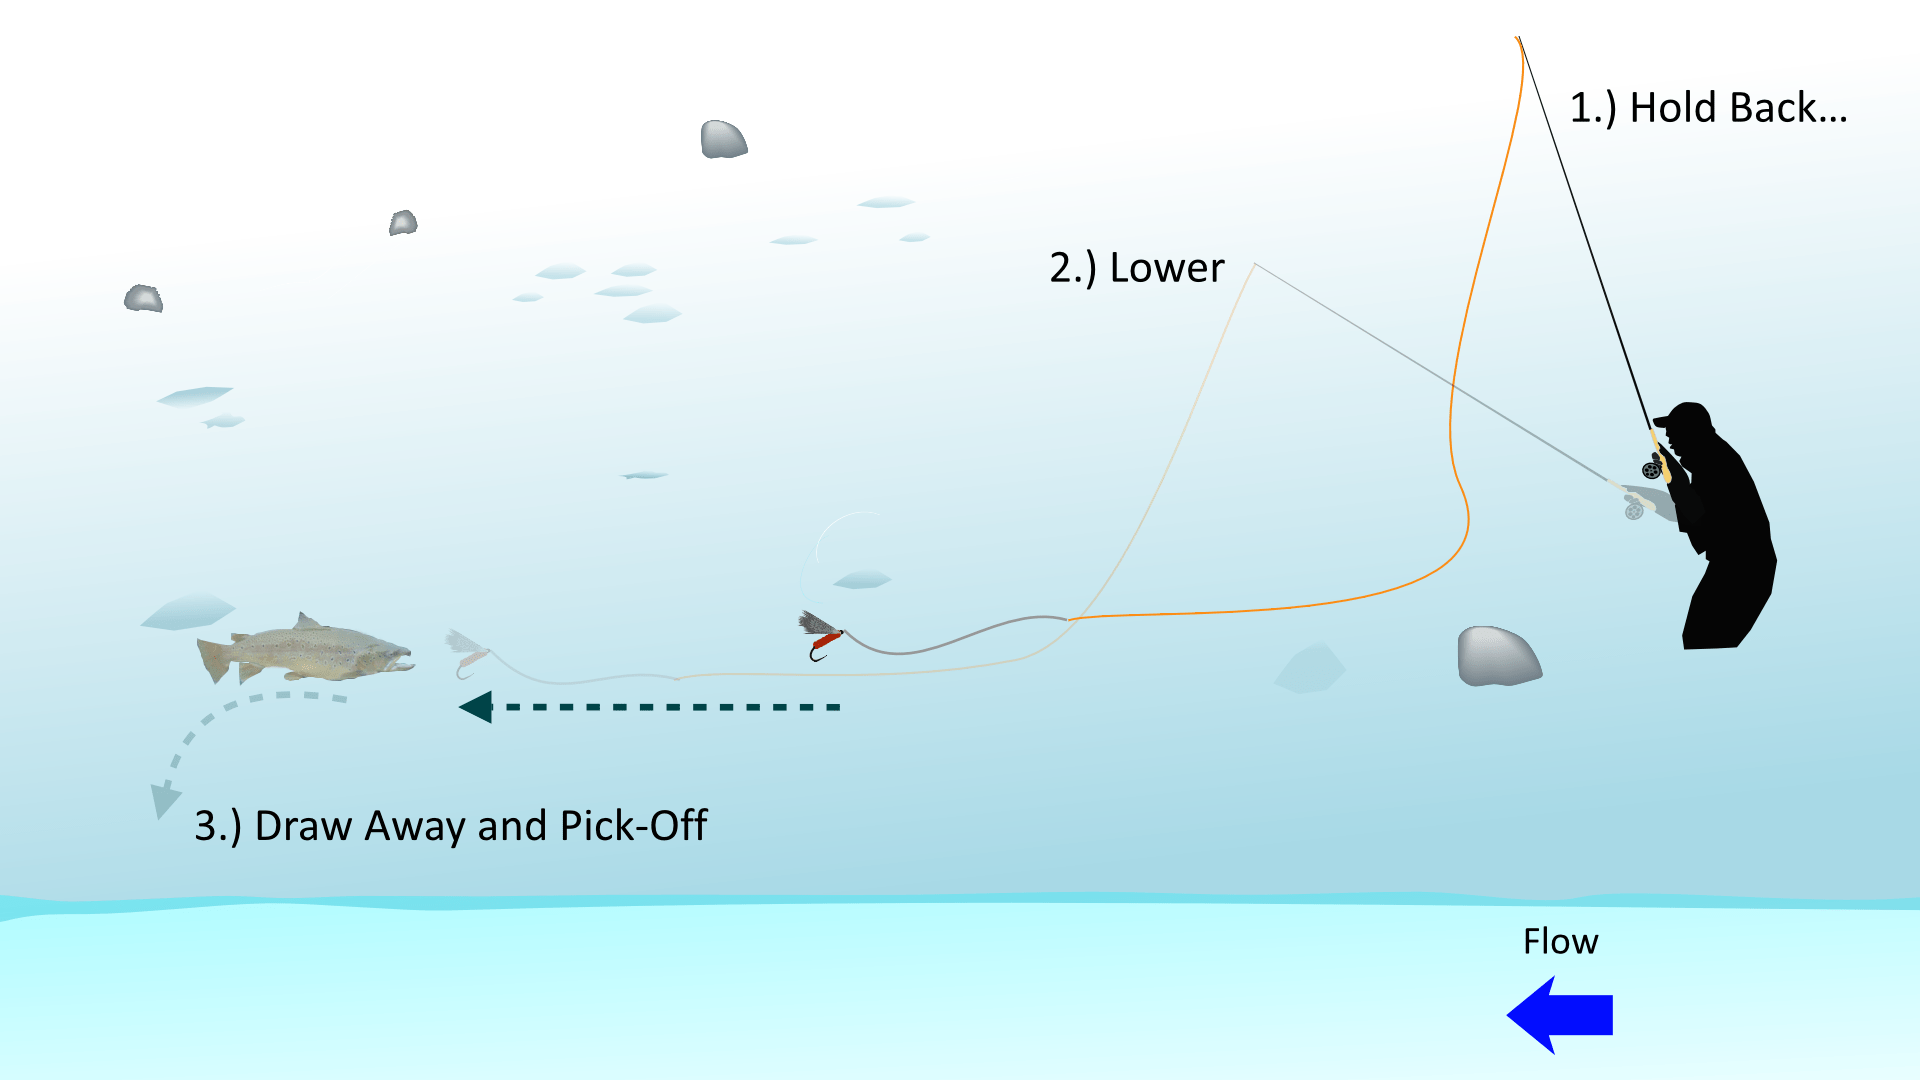
It takes a bit of practice to get the judgement of how much additional line/distance you need to allow in your first cast (so that your fly actually has enough line to reach the feeding fish!).
If the target fish doesn’t eat your fly on the first cast, try to lean your rod tip over to gently draw your fly, leader and line away to one side of the fish. You might get lucky and be able to pull everything far enough from the fish to be able to stealthily retrieve your line and gently lift off and make another cast; MAYBE.
Mending your line
When dry fly fishing for trout – or any other species – you will often need to cast your line across corridors of water travelling at different speeds. The idea with “mending” your line is to put some extra line into the faster parts of the current. Making this work relies on positioning that extra line further upstream than the line laying in the slower water.
That way, you buy some time while the currents eat up the extra slack – before the line comes tight to your fly again and starts to drag it.
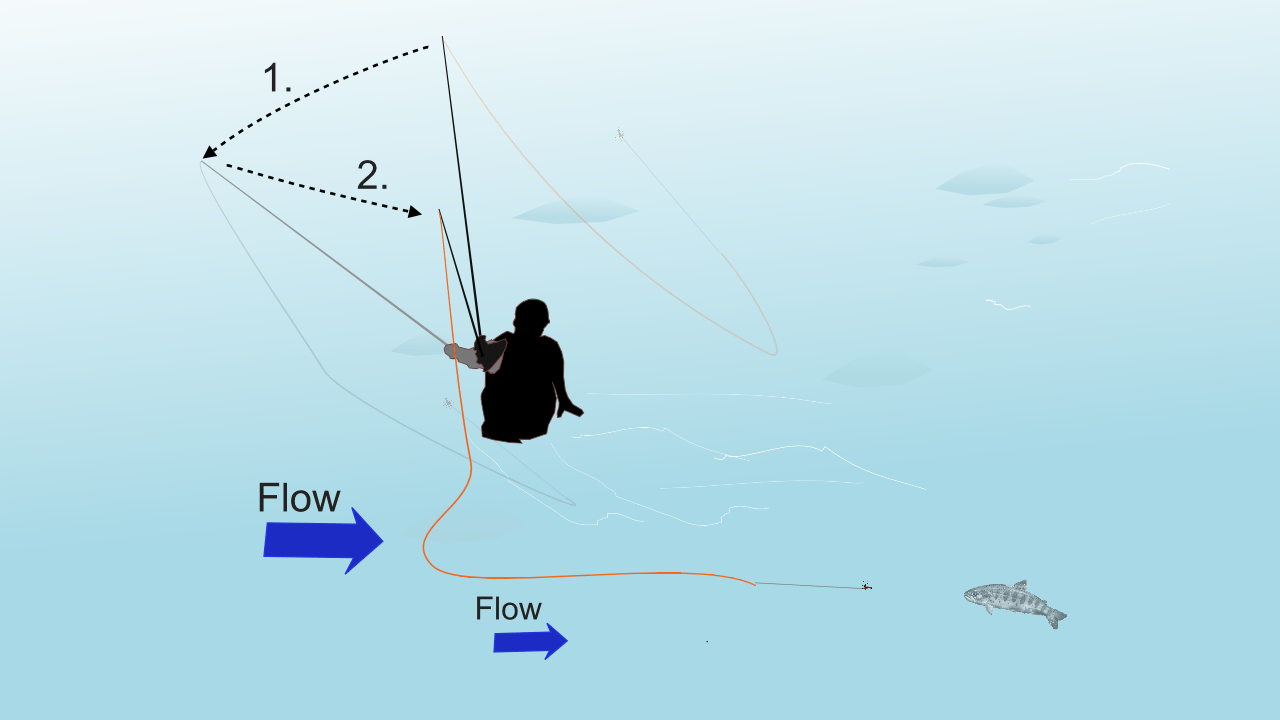
Technically, this is an "aerial reach-mend" - but all you are doing is steering your shooting line up into the faster flow just before it lands
The best way to mend for dry fly is to position that line while it is still in the air. This makes the line lay in just the right shape on the water as your fly lands. By doing this, you’re fishing effectively right from the moment your fly touches down.
THE MOST IMPORTANT THING with that is to shoot your slack line into that curve (from your rod hand) and NOT pull everything tight to your fly.
In other words, the line that makes the curve can't come from pulling back the fly end of your rig - it has to be EXTRA line allowed to slip into the cast from the reel-end of the rig.
Timing your casts
It doesn’t matter what angle you are casting to the current, you always need to time your casts carefully. As an absolute baseline, you need to be sure that the fish is feeding confidently you’re your fly passes over it.
Machine-gunning casts over a fish is a sure-fire way to cause it to sulk on the bottom of the river and stop feeding (or even to bolt for cover in terror).
Between each refusal, it’s a good idea to allow the fish to take several natural flies to encourage it to keep feeding. Less is more!
Always bear in mind that your first shot at a fish is always your best – so make it count by doing everything you can to avoid spooking it. Try to have the patience to let it establish a regular, confident feeding rhythm after you have got into position to cast. This is WAY more difficult when your target fish is rising sporadically.
That being said, there are many rivers (usually with reasonably clear water) where a good size caddis imitation or a nice terrestrial beetle "splatted" down on the surface can pull fish up - even if they are not actively rising to a hatch of natural flies. Great training for this style is to get good at reading current features by developing your Euro nymphing tactics.
Timing AND Placing your Casts
Another nearly impossible situation can happen in completely still water (e.g. behind a dam or other structure that holds water back – whether natural or engineered by humans). In still - or very slow - water, fish are more likely to rove around and rise in different spots depending where the food is.
When that happens, the very WORST place to cast is where the fish just surfaced – since that is the ONE place it is guaranteed NOT to be. In other words, the fish can be rising sporadically in time and also varying their location constantly. At least when a fish is holding one station in flowing water, it might only be the timing that is sporadic!
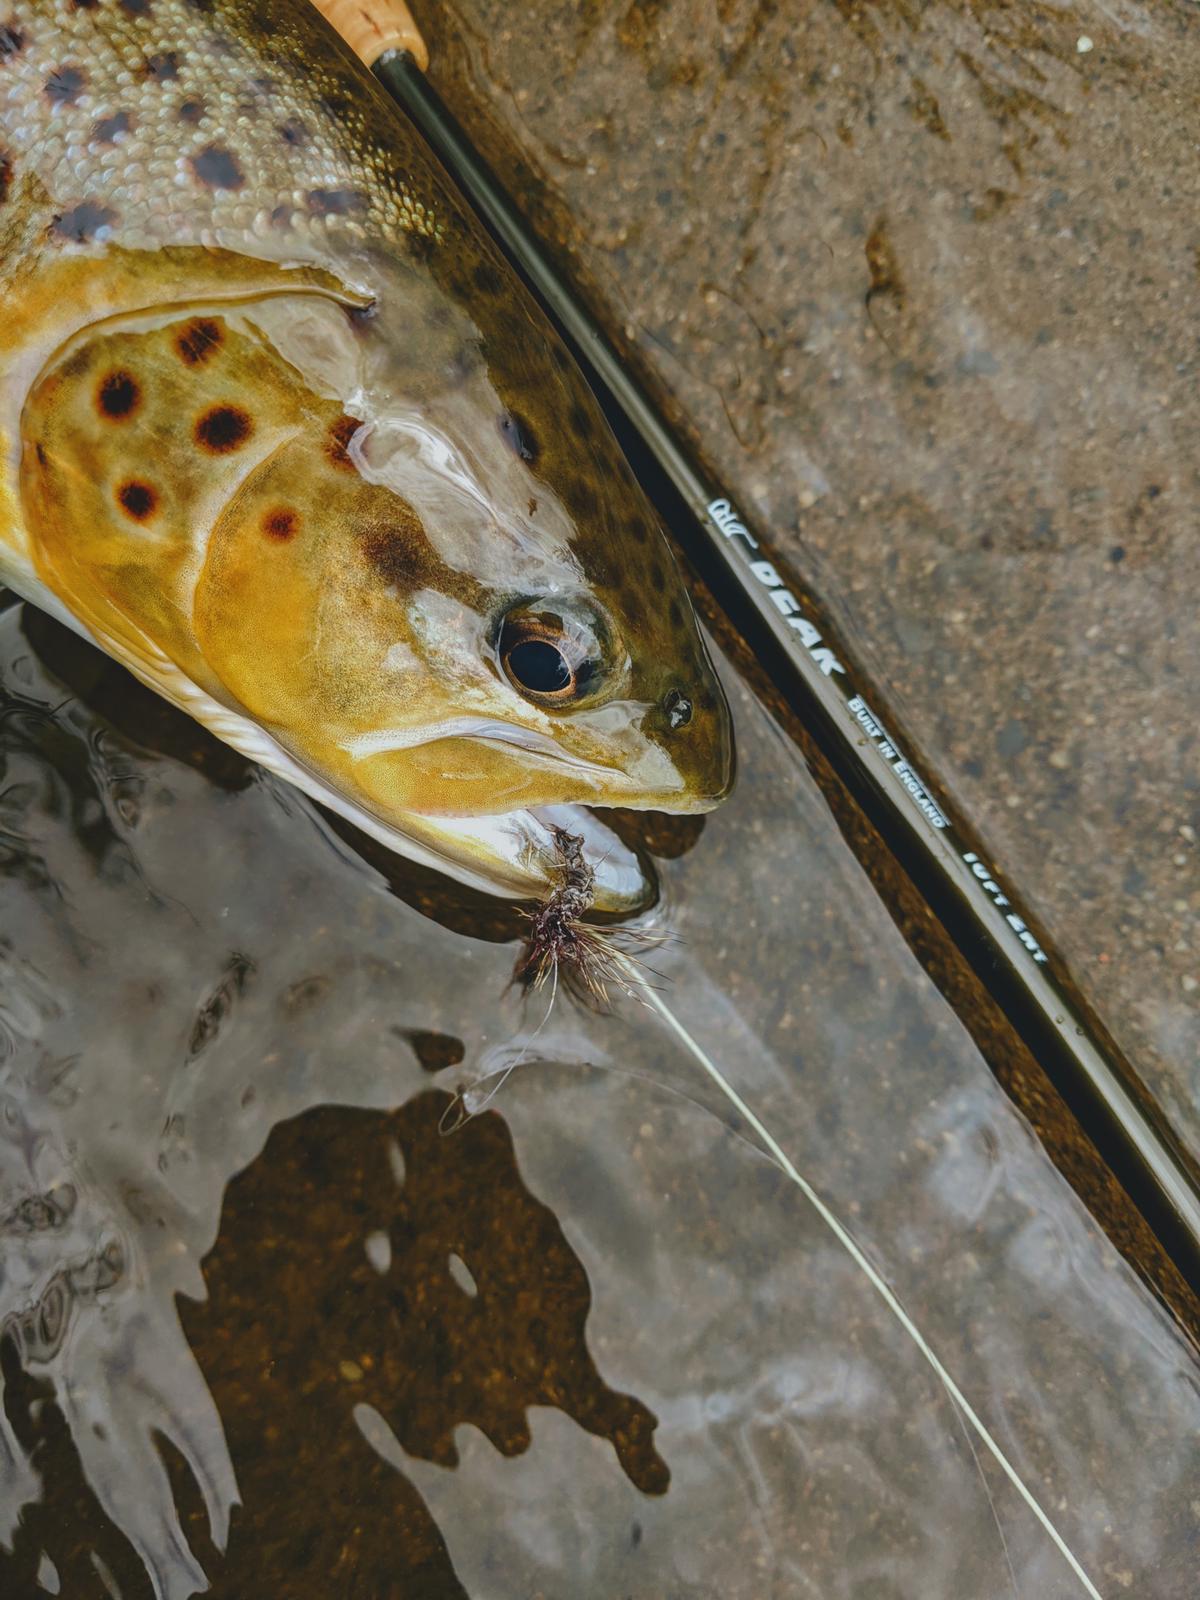
Duncan got the timing and the placement of his fly just right for this lovely wild trout (Duncan Philpott photo)
Your best chance for roving fish is to observe and see if the fish has an established patrol route – and try to intercept it along that path. If all else fails, casting out in a likely spot and leaving your fly can sometimes work.
Expert anglers in New Zealand often talk about this as one of the differences between dry fly fishing for brown trout and targeting rainbows. Big brownies seem a bit more prone to establishing a patrol route in backwater features...whereas the rainbows are a bit more likely to hold station in the faster flows.
Cadence of rising fish
An often overlooked aspect of timing your cast is also to lock into that rhythm of a rising fish. For different sizes of prey item, it will take a different amount of time for the fish to gulp down and be ready to eat the next item. Similarly, the deeper a fish is lying, the longer it takes it to move up to the surface and then back onto station.
Behavioural ecologists call this "handling time" (here's a handy graph showing the handling time for different sizes of mussels for crabs):

As well as the handling time - this shows the "profit" in calories they get back for different amounts of effort; this is what also explains how far a fish will move to intercept prey. Bigger flies can pull a fish up from the stream-bed - which was the original purpose of the Klinkhåmer special...
For tiny aphids, there is virtually no lag needed because both of the following effects combine:
- Depth - the fish are often stationed just an inch or so below the surface; so it only needs to tilt a fin and angle its head up slightly to gulp down its meal
- Meal size – aphids are so small that they can just be swallowed in one gulp (the trout doesn’t need to subdue its prey or make a couple of gulps to ensure it goes down the gullet).
Successful dry fly anglers learn to match the timing of delivering their fly to to timing of the feeding rhythm of the trout. Too many anglers think their fly has been refused simply because it floated over the fish when it was still returning to its station and/or still gulping down its previous victim.
Rise-Forms: What are they Eating?
Now we are building some pretty sophisticated understanding into the whole deal. The way that fish break the water when they take natural flies from the surface can help you make a better choice of dry fly design. Here is a very quick guide that, although simple, you might find helpful in making fly choices. Note, these are simply decent “best guesses” - not set in stone:
How to Time your hookset when dry fly fishing for trout
As well as timing of delivering your cast, you need to tune the timing of your hookset to the fish you are targeting. Ideally the fish needs to have turned down with your fly before you set the hook. By the same token, you don’t want to leave it so long that the trout has decided your artificial fly feels more like hard debris than juicy insect (and spat it out).
A basic guide to follow is that the larger the fish, the longer the pause needs to be before it is facing down with your fly in its mouth.
One of your challenges is to work out the ideal pause for the fish in your own stream.
This will tend to vary with rise-form, holding depth and current speed as well as size of fish.
Avoiding drag with “competition” style dry fly
With a “traditional” French leader (i.e.NOT the ultra thin “Spanish” and “Nymph au fil” leaders), it is very easy to cast a dry fly without using the weight of your main fly line. The taper and chemical treatment/texture of the leader makes it easy to cast like a fly line.
However, unlike a fly line, it is MUCH easier to hold that leader off the water and take drag out of the equation completely. For pocket water (and also ultra spooky fish) this approach can be an incredibly effective way of dry fly fishing for trout.
I recommend rods of AFTM #3 and BELOW for this tactic – and long rods (over 10-ft) are a significant advantage for holding that leader off the water.
These traditional French leaders (a little bit more similar to Domenick Swentosky's "Mono Rig" approach) can be quite difficult to get hold of, so it’s good to know there is a good hack for this rig. In fact, you can achieve a very similar effect by using a 100% fluorocarbon level line designed for Japanese “tenkara”. For long fly rods below AFTM #3, a good starting point would be a tenkara level line rated as a #3.5 on the Japanese diameter scale.
Basic fly manipulation
Although I’ve written an entire pocket guidebook and we have a full video bundle on this subject, it is worth experimenting with some basic dry fly manipulation tactics for yourself. Presenting a fly in that “competition” style (above) with all the casting line/leader off the water opens up one of the single most effective tricks you can use.
- By simply tapping your finger on the rod handle, it will send vibrations down the line/leader and make your fly start “buzzing” gently on the surface.
- If you’re fishing a normal fly line, you can still move your dry fly to good effect. Try pulsing the rod tip on a steady “1, 2” count to move your fly a couple of inches at a time.
This is particularly effective when caddis are actively zooming about just sub-surface as part of their hatching process.
OK – that’s probably enough to keep you going for a long time on stream (PHEW!); please feel free to share your own results, your thoughts and any glaring omissions/stuff you want to argue about (!) in the comments below.
Dr Paul Gaskell
(Fishing Discoveries).

Dear Paul,
I have a couple of your books and have also greatly enjoyed the content of your website and emails. Plenty of thought provoking ideas, excellent pedagogy, backed up with some science and stressing the importance of principles and cross fertilisation. Really excellent, I can hardly believe that you are a Yorkshireman! (Lancastrian bias).
French Leader with dry and dropper proved successful in Australia’s Snowy Mountains and your rig has the added advantage that you can fish at distance with conventional fly fishing techniques where getting close by wading is a problem.
In the videos the fish caught seem quite small. Is this just a result of the current state of UK rivers or something else? In terms of suggestions links to tying videos for the flys would be a wonderful addition.
Hi Graham – thanks for your kind comments.
I’ll get it in the neck from both sides when I say this, but I was born/grew up close to Wigan in Lancashire; but I’ve now lived in Yorkshire for the majority of my life (so I think they’ve revoked my Red Rose passport – and I was probably never eligible for a White Rose one ha ha ha!).
Regarding the size of fish – partly it is a reflection on the fact I rarely fish rivers that receive stock fish. As a result in a healthy wild trout population there should be a “pyramid” of numbers for each age/size class (unless affected by habitat bottlenecks, heavy predation or episodes of pollution that restrict certain age/size classes of fish). That means there will always be several hundred small/tiny trout for every one large adult specimen.
Depending on the altitude and water chemistry/nutrient levels, trout will grow either faster or slower; so there is no real standard size for a “4-year old trout” across the UK.
As a general worldwide benchmark, a wild trout weighing 1lb is a considerable achievement against the odds of survival and growth rate.
In certain situations (low trout density per mile due to heavy predation/habitat bottlenecks with base-rich water chemistry and large food supplies) you might have fisheries where you don’t get excited until wild fish reach 4lb in weight; but they are significant outliers – and in the case of NZ rivers partly the result of introductions of invasive/non-native trout causing local extinction of the native (e.g. galaxiidae) fish.
However, in stocked river fisheries – there is a completely unnatural skew towards fish in the 1lb to 2.5lb bracket (or even larger) at densities that would never occur through self-sustaining breeding and survival in-stream.
You can find examples of all those situations in the UK – though a lot of my fishing for videos is done in predominantly wild, upland trout rivers to provide a high catch rate from a good density of wild fish (to keep filming efficient while still showing positive reinforcement of a particular technique).
All the very best,
Paul
Thanks so much. Shared this with family members. We are beginners but with the passion so strong! Send out anything ! Fly tying too!
Very good article. Reminded me of what I might be doing wrong! Comments on fly design very pertinent in lockdown. Lots of opportunity for experiments.
Thank you David – glad you enjoyed the article. I look forward to hearing about the results of your experiments.
Paul
Thanks for a great read. It is good to re-visit the basics some times and improve as a result. Love the photos you have included. A good source for those new to our sport and I be sure to point new members of our club in your direction. Thanks again Paul
Thank you Ian – your feedback on it acting as a solid resource for newcomers is extremely helpful (because that’s exactly what I was going for with this guide).
I do also greatly appreciate the recommendation for our site as a resource – this self publishing game is all about our individual relationships with the people that we can help the most; so here’s to the pursuit of mutual benefits! 🙂
Paul
Re: tenkara level line hack.
Paul, I was wondering if you’ve ever boiled your fluoro tenkara leaders? If so, did it improve their performance?
Thanks for the thorough dry fly article.
Harold
Hi Harold – thank you so much.
As yet I’ve never tried boiling fluorocarbon lines; but I have done it a lot (particularly benefiting from JP’s research and experiments) for nylon leaders. The reason I’ve done it with nylon and not fluorocarbon is that, one of the purposes of boiling it is to make it more stretchy (or “increase the elastic modulus” in the geeky text-book terms). Not only does that make the material more supple – it also helps to protect very fine tippets.
When I choose fluorocarbon, I’m usually looking to benefit from its slightly greater stiffness and more wiry texture (at least in the diameters that are most useful for tenkara level lines). I’m also usually “shooting for the pin” and holding as much tippet as possible off the water right up to the fly (even if it’s a wet fly). That means I can get away with thicker and shorter tippet – which also helps with pinpoint accuracy.
However, all that being said, I’d be curious to hear of any results that people have had by boiling fluorocarbon – I confess I have no real idea exactly what that would feel like!
Best wishes
Paul
Thanks. I guess there’s one way to find out. I have plenty.
I’m looking forward to hearing how you get on, so feel free to report back on this comments thread…
Paul
Hi Paul,
I boiled a tenkara line yesterday, and I didn’t see much difference other than it felt a little softer. I boiled a 3.5 DRAGONtail brand line (orange) for 3 minutes in plain water, since I don’t know the secret “sauce” recipe. I cast the line before and after on a 10′ 3wt. “Euro” rod before and after, and didn’t notice any difference in the castability. When I boiled my Maxima “French” leader, I thought it cast much easier, but I don’t know if that’s the point of boiling, or chemically treating a leader. So, for me at least, there doesn’t seem to be an advantage to boiling a fluro line, although John’s “sauce” may alter the characteristics and make it better in some way.
Thanks,
Harold
Thanks for reporting back Harold,
As with a few of our activities and interests, I’m working on including more details in the nymphing book, which is progressing well over summer. I hope to be able to include chapter and verse on leader treatments and “recipes” in there – which might help you to continue with any of your own experiments.
Very best wishes
Paul
Thanks, I look forward to it.
Excellent article. At the times and places where I usually fish for wild brown trout, rises are generally sporadic at best, so I rarely get to target specific fish. I still catch my share by fishing the water with adult caddis or terrestrial imitations when fish are feeding opportunistically. You might want to mention something about this situation. Also one nit-picking comment: as far as I know, insects don’t actually have lungs.
Hi Steve – thanks for this and you’re right that the “fishing to features” approach would be good to include. I am actually itching to dive even deeper into several elements – but I had to tell myself to calm down and get my first version published ha ha ha!
You’re dead right and although I fought shy of “tracheae” and “spiracles”, haemolymph and suchlike – I possibly over-simplified things by referring to “lungs” as the air-breathing stage…I’ll have a think on an accurate, but still not too intrusively complicated phrase to replace that; good call (thank you!).
Paul
Excellent article. Thorough, thoughtful and engaging. Thank you.
Thanks Ian – I have to admit that point where I realise:
“I’m going to have to do some serious diagrams for this…”
always makes me look for excuses to put off writing it ha ha ha! However, it does make it especially rewarding when it turns out to be interesting and useful to you and other anglers.
Paul
Just wanted to say thanks for a reflective and detailed piece with something for beginners and experienced anglers alike. Articles like these from Paul have allowed me to up my game with noticeable improvements in my catches, with many of the principles also applied to chub and dace fishing close to where I live.
Kerry, that’s awesome and thank you so much for taking the time out to leave your feedback. I really appreciate it on a personal as well as a “website performance” level, which is, of course, really important for our prospects to continue publishing articles and videos like this.
Thanks again
Paul